IPS-induced intestinal organoid culture strategy

IPS-induced intestinal organoid culture can be divided into three stages: culture of human pluripotent stem cells, endoderm differentiation and meso/hindgut patterning induction, and organoid culture.
Culture of human pluripotent stem cells
1. Experimental preparation:
1. Preparation of human pluripotent stem cell culture medium
(1) Thaw hPSC Medium Supplement at 2-8°C, shake up and down after thawing, mix well, divide according to the actual dosage, use immediately or store at -20~-80°C, avoid repeated freezing and thawing;
(2) Add hPSC Medium Supplement (10mL) to hPSC Medium Basal Medium (500mL) at a ratio of 1:50, and mix evenly to become human pluripotent stem cell medium(abs9403)。
Note: Mixed human pluripotent stem cell medium can be stored stably at 2-8°C for 2-3 weeks, and it is not recommended to use human pluripotent stem cell medium that has been prepared for more than 3 weeks.
(3) Experimental reagent balance: human pluripotent stem cell medium is placed at room temperature and protected from light before the experiment; PBS, digest and other heat at 37°C.
Note: The medium contains factors, do not warm in a 37 °C water bath.
2. Operation method (the following steps should be operated under sterile conditions)
hPSC cell recovery:
1. Experimental operation steps:
1.1. Matrigel-coated culture plate: take out the 6-well plate/12-well plate, add 1mL/0.5mL Matrigel(abs9410),to each well, gently shake the 6-well plate/12-well plate to make the Matrigel completely cover the bottom of the dish, place it in a 37°C incubator and incubate for 1h~2h, take it out and place it in a clean bench/biological safety cabinet before the experiment and equilibrate it at room temperature for 20min. If not used temporarily, store at 2-8°C after Parafilm closure and use within 1 week.
Note:
(1) The number of cryopreserved stem cells is 1×10⁶cells/mL, corresponding to 1 well of a 6-well plate;
(2) The ready-to-use Matrigel is sensitive to temperature, take it immediately after use, and put it back to the 4°C refrigerator immediately after use, and do not directly touch the bottle body within the reach of the Matrigel liquid level with your hands, which will affect the quality of Matrigel.
1.2. Add 2~3mL of stem cell medium to a 15mL centrifuge tube for later use.
1.3. Thawing: Quickly immerse the cryopreservation tube taken out of liquid nitrogen in warm water at 37 °C and shake it quickly to thaw it within 1~2min;
Note: Cells should be removed from liquid nitrogen quickly, minimizing the amount of time they are exposed to room temperature.
1.4. Centrifugation: After the cryopreservation solution in the cryopreservation tube is thawed, it is added to the 15mL centrifuge tube containing stem cell culture medium drop by drop, and the 15mL centrifuge tube is placed in a low-speed centrifuge for equilibration, and centrifuged at 1000rpm for 3min;
1.5. Resuspension: After centrifugation, discard the supernatant and add 1mL of human pluripotent stem cell medium to aspirate and mix the stem cell pellet, and blow and aspirate about 3~5 times.
1.6. Inoculation: After aspiration is uniform, discard the ready-to-use Matrigel that has been balanced, add the evenly piped stem cell suspension to the coated 6-well plate, and complete the 2mL culture system per well.
1.7. Culture: The seeded 6-well plate can be placed under an inverted phase contrast microscope to observe the density of seeded stem cells and the size of the cell clump, which is more qualified than 4 cell clumps, and the horizontal cross gently shakes the 6-well plate/12-well plate to make the cells evenly distributed. and placed at 37 °C, 5% CO2The cells were observed on the 2nd day of incubation in a constant temperature incubator.
1.8. Fluid exchange: change the fluid every 24 hours from the time of resuscitation.
Note: Since the active ingredient in the medium is only sufficient to last for one day, fresh medium should be replaced every 24 h.
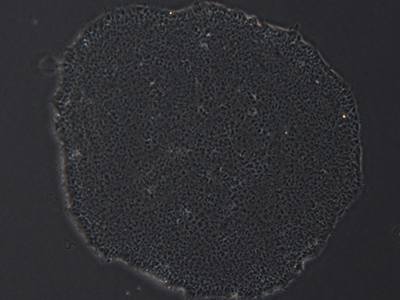
Pluripotent stem cell (PSCs) colonies
hPSC cell passaging:
2. The specific operation steps of the experiment:
2.1. Cleaning: Aspirate off the original medium, slowly add 1mL of PBS buffer to the wall and shake it gently, and then suck off the PBS buffer along the edge of the Petri dish;
2.2. Digestion: Add 2mL/well human pluripotent stem cell digestion solution (abs9409) to the 6-well plate to cover the bottom of the dish and place it in a 37°C incubator for 2~5min;
Note: The digestion time varies slightly depending on the stem cell growth density, and is generally recommended to be 2-5 min based on experience. During the digestion process, you can take it to an inverted microscope to observe the digestion of the cells, and if you can observe the gaps between the edges of most of the clones and the cells inside the clones under the microscope, you can suck off the digestion to stop the digestion.
2.3. Pipetting: After sucking off the digestive juice, add 2mL of human pluripotent stem cell medium, fan blow the bottom of the petri dish with a pipette, and gently blow it 3~5 times to make the stem cell colony at the bottom of the dish fall off, and transfer it to a 15mL centrifuge tube;
Note: The strength of the bottom cells of the blowing dish should be gentle, and the number of blowing and sucking and mixing should be 3~5 times, and try to avoid the formation of single cells. It is normal for a small number of cells to fail to detach from the bottom of the dish. If a large number of cells do not detach from the bottom of the dish, the digestion time should be prolonged.
2.4. Centrifugation: centrifugation at 1000rpm for 3min, discard the supernatant;
2.5. Inoculation: Blow the cells 5-10 times with stem cell medium, suck off the matrigel in the coated culture plate, add the cell suspension to the culture plate, and complete the culture system of 2mL per well.
Note: Pipette the cells gently and do not blow more than 10 times.
2.6. Liquid change: every 24h from the time of passaging.
Note: Since the active ingredient in the medium is only sufficient to last for one day, fresh medium should be replaced every 24 h.
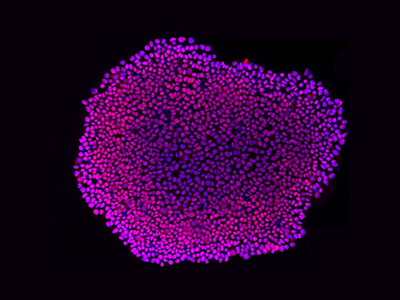
Colony staining of pluripotent stem cells (PSCs).
hPSC cells are cryopreserved
3. The specific operation steps of the experiment:
3.1, cleaning: the same as 2.1;
3.2, digestion: the same as 2.2;
3.3, blowing: the same as 2.3;
3.4, centrifugation: the same as 2.4;
3.5. Resuspension: discard the supernatant after centrifugation, add 2mL of ES/iPS cell cryopreservation solution (abs9412) to aspirate and mix the stem cell pellet, and add it to the cryopreservation tube after 3~5 times;
Note: Take the cryopreservation solution immediately and put it back in the 4 °C freezer in time.
3.6. Record: mark the type, time, operator and cell batch of cryopreserved cells on the cryopreservation tube.
3.7. Freeze at -80°C: Place the vials in the freezer at -80°C overnight.
Note: When placing the vials in a -80°C freezer, place them in an upright position, not diagonally or horizontally.
3.8. Liquid nitrogen cryopreservation: after 24 hours, the cells in the -80 °C freezer will be transferred to liquid nitrogen for long-term cryopreservation.
Induction of endodermal differentiation and midgut patterning
1. Preliminary preparation
1. Reagents and equipment
- Cells: H1/H9 hESCs or patient-derived iPSCs.
- Medium: Human pluripotent stem cell medium (abs9403), RPMI 1640 (abs9484).
- Digestive juice: Human pluripotent stem cell digestive juice (ABS9409)
- Media additives: L-alanyl-L-glutamine solution (2 mM) (abs9295), bispecific antibody (abs9244)
- growth factor:Activin A(100ng/mL)(abs05801)、FGF4(500ng/mL)(abs06269)、WNT3a(500ng/mL)(abs05632)。
- Matrigel: ready-to-use Matrigel (culture plate coating) (ABS9410), organoid-specific Matrigel (ABS9495).
- Serum: Dialyzed fetal bovine serum (ABS945)
- Key equipment: surface Petri dish, stereomicroscope, sterile scalpel, pre-cooled microcentrifuge tubes.
2. Reagent preparation
- Endoderm differentiation medium:
- Day1:RPMI 1640+L-alanyl-L-glutamic acid solution(2mM)+dual antivirus(1%)+Activin A(100ng/mL)。
- Day2: Day1 formula + dialysis fetal bovine serum (0.2%).
- Day3: Day1 formula + dialysis fetal bovine serum (2%).
- Midgut and hindgut differentiation medium:
-RPMI 1640+Dialyzed Fetal Bovine Serum(2%)+FGF4(500ng/mL)+WNT3a(500ng/mL)。
2. Passage and plating of hPSCs
1. Cell passaging (2 hours)
- Digest hPSCs using human pluripotent stem cell digest until the edges are rolled up.
- Gently peel off the cell clump with a cell scraper and pipette repeatedly until the cell clump is 1-2 mm in size.
- Seed 1:6 into Matrigel-coated 24-well plates (approximately 5,000 cell pellets per well).
- Tap the plate to evenly distribute the cells and incubate at 37 °C overnight.
2. Cell expansion to 85-90% confluency (3-4 days)
- Change the human pluripotent stem cell medium daily to observe the cell density.
- Critical: Re-plating is required if the density is too high (spontaneous differentiation) or too low (low differentiation efficiency).
3. Endoderm differentiation (3 days)
1. Day1: Aspirate the human pluripotent stem cell medium, add the Day1 endoderm medium (serum-free), and culture for 24h.
2. Day2: Replace with Day2 endoderm medium (containing 0.2% dialysed fetal bovine serum) and culture for 24h.
3. Day3: Replace with Day3 endoderm medium (containing 2% dialysed fetal bovine serum) and culture for 24h.
4. Verify differentiation efficiency (optional):
- Immunostaining for FOXA2/SOX17 double-positive cells (85-90% efficiency).
4. Midgut patterning (3-4 days)
1. Induce spheroid formation
- Aspirate the endoderm medium, add the mid/hindgut differentiation medium, and change daily.
-48 hours later: Stereomicroscope was observed to observe the thickening of the epithelium, and the spheroids were detached from the monolayer of cells at 72-96 hours.
2. Collect spheroids
- Collect free spheroids, approximately 50 per tube, with a 200 μL pipette tip, and place on ice for later use.
Organoid culture (14-28 days)
Primary
1. Preparations
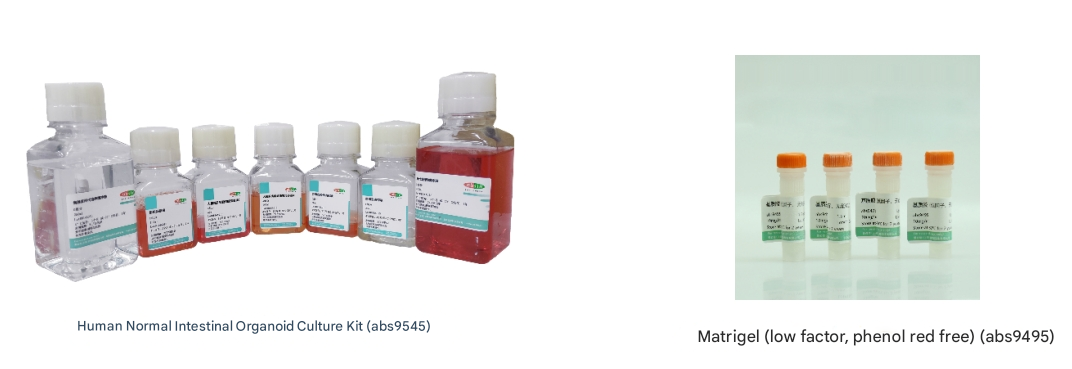
Reagent consumables
Human Normal Intestinal Organoid Culture Kit (ABS9545), Matrigel (low factor, phenol red-free) (ABS9495), 15 ml centrifuge tubes (ABS7102), 1.5 ml EP tubes (ABS7119), 24-well cell culture plates (ABS7035), metal ice box.
|
Component name |
specification |
|
Organoid medium A |
100ml |
|
Organoid Primary Culture Buffer B |
250ml |
|
Primary tissue digest C |
30ml |
|
Organoid passage digest D |
30ml |
|
Tissue Preservation Solution E |
100ml |
|
Organoid cryopreservation solution F |
20ml |
|
Organoid subculture buffer G |
250ml |
Second, the operation process
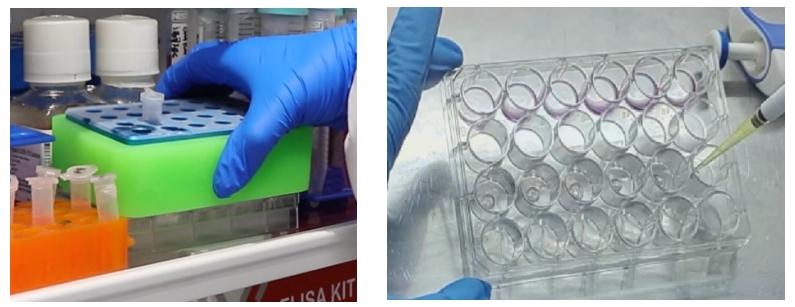
1. Glue addition - dot plate - liquid addition (here is the finishing touch of the entire primary operation)
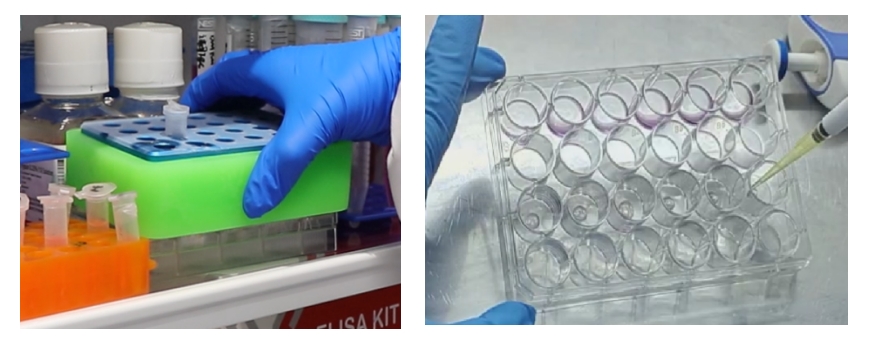
(1) Preparation
A Matrigel needs to be stored in a metal ice box and melted overnight in a refrigerator at 4°C;
b Pipette heads and centrifuge tubes need to be pre-cooled at -20°C for at least half an hour in advance;
c The melted Matrigel can be stored at 4°C all the time, and it is recommended to use it up within 2 weeks.

Low Temperature Metal Ice Box (ABS7289)
(2) Vaccination requirements
24-well plate (ABS7035), 25 μL Matrigel spheroid mix per well, 500-750 μL organoid medium.
(3) Inoculation density
Density recommendation 1: total volume of Matrigel: total volume of spheroids = 25:1 (if it is difficult to estimate the volume of cell mass precipitation, usually 300uL of Matrigel is sufficient).
Density recommendation 2: 50 spheroids/25uL Matrigel (if you want to count the inoculation, you can refer to this density recommendation).
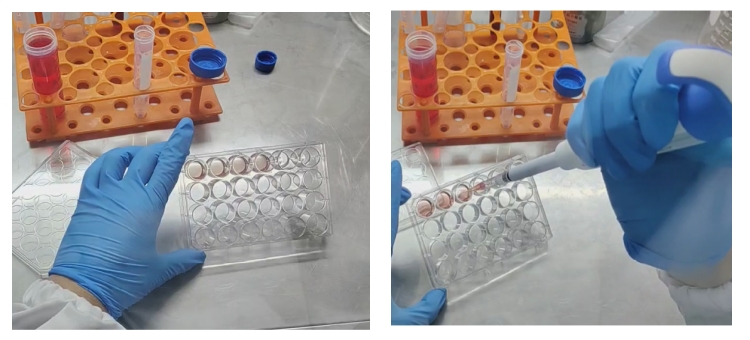
(4) Glue - dot plate
Matrigel (ABS9495) was added to the cell pellet, and the mixture was carried out by pipetting (do not blow full, it is easy to produce bubbles), and then the plate was spotted. The entire operation is carried out on a metal ice box or ice. After the operation is proficient, the glue is added, mixed evenly, and the dot plate is controlled within half a minute, which is conducive to maintaining the good fluency of the matrix glue.
(5) Add liquid
Put the laid culture plate into a 37°C incubator for 40-60 min to form gelatin, and add 500-750μl of organoid medium A for culture. About 10-14 days, most organoids are 200um-500um in diameter and can be passaged.

Plating density
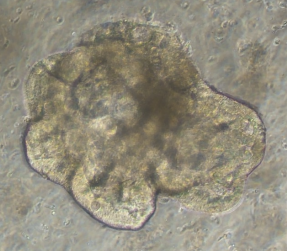
Small intestinal organoid growth map
Passage (digestion in two cases).
1. Passage steps for a large number or volume of organoids
1. Organoid collection and washing
1) Collection: Aspirate the medium with a pipette, add 1-2ml of about 4 °C organoid subculture buffer G per well, gently blow off the Matrigel, and collect in a 15ml centrifuge tube (24-well plates, every 5 wells as a group).

2) Washing: add organoid subculture buffer G to 14ml (the more buffer, the more fully the Matrigel is diluted, the easier it is to remove), stand at 4 °C for 40min or -20 °C for 5min (the purpose is to soften the Matrigel, if the refrigerator has a strong thermal insulation effect, shorten the freezing time, and grope for the appropriate freezing time, you can take out the centrifuge tube and shake it to see the Matrigel, indicating that the cooling is good).
3) Next, the centrifuge tube is centrifuged at 300g, 4°C, and centrifuged for 5min.
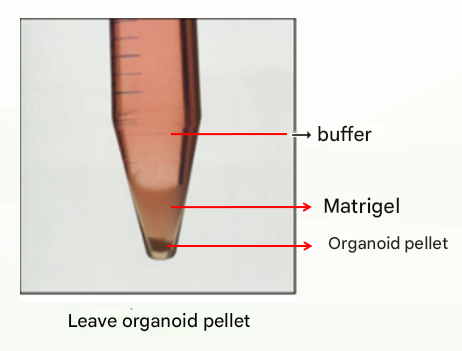
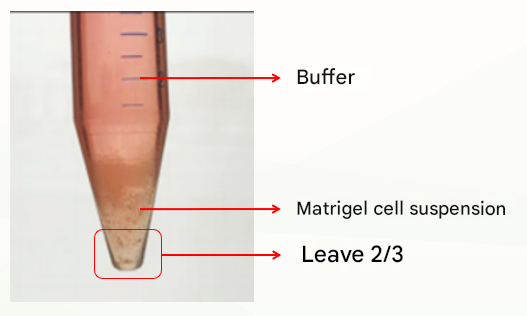
The first is the normal situation, which is divided into three layers (as shown below), at which point the supernatant and matrigel layer are discarded and the organoid pellet can be retained.
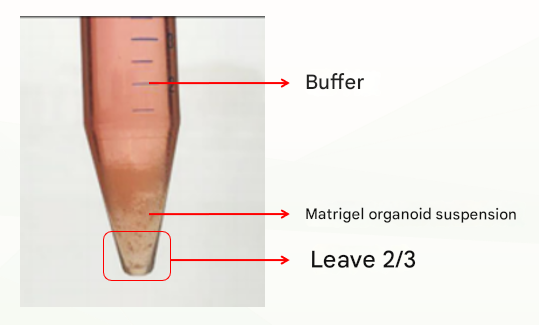
The second is an abnormal situation, which is divided into two layers (as shown below), which may be related to insufficient cooling. At this time, discard the buffer, leave the matrix colloid organoid suspension, repeat the previous washing step, cold centrifugation again, and usually clear stratification (buffer layer, matrigal layer, organoid precipitation layer), at this time, discard the supernatant and matrigel layer, and retain the organoid pellet. If there are still two layers (buffer layer and Matrigel organoid suspension layer), discard the buffer and the top 1/3 of Matrigel organoid suspension and keep the bottom 2/3.
Conditions to facilitate efficient isolation of Matrigel and organoids:
aThe choice of centrifuge is very important, and the horizontal angle centrifuge is more conducive to the separation of Matrigel and organoids than the fixed angle centrifuge;
bThe temperature of the centrifuge should be 4 °C (to avoid the curing of the matrice), the centrifugal speed can be appropriately increased (the maximum should not exceed 500g), and the centrifugation time can be appropriately extended (the most common is not more than 10min).
2. Organoid digestion
1) Add 2-3mL of organoid passaging digestion solution D to digest in the clean table for 2-3min, and pipette 1-2 times during digestion. This step is mainly to digest the cell clumps, never digest into single cells, and the survival rate of single-cell organoids is low. If you are unsure whether digestion is appropriate, you can aspirate a few microliters and observe it under a microscope, and if there are more cell clumps, you can stop digestion.
2) Add 5 times organoid subculture buffer G (buffer: digestion solution = 5:1) to terminate digestion, centrifuge at 300g at 4 °C for 5min to discard the supernatant (if there is Matrigel residue, the residual amount < 50ul is normal, and it does not affect the proliferation of submerged organoids).

3. Glue addition - spot plate - liquid addition
(1) Preparation
A Matrigel needs to be stored in a metal ice box and melted overnight in a refrigerator at 4°C;
b Pipette heads and centrifuge tubes need to be pre-cooled at -20°C for at least half an hour in advance;
c The melted Matrigel can be stored at 4°C all the time, and it is recommended to use it up within 2 weeks.
(2) Vaccination requirements
24-well plate (abs7035), 25 μL Matrigel cell mass mix per well, 500-750 uL organoid culture medium.
(3) Inoculation density
Density recommendation 1: Organoids are usually passaged 1:2, e.g., 5 wells are collected in a 24-well plate and 10 wells are passaged, and the amount of Matrigel required is 25*10=250ul
Density recommendation 2: 500 cell clusters/25 uL Matrigel (if you want to count the seeding, you can refer to this density recommendation).
Note: Regardless of Density Recommendation 1 or Density Recommendation 2, if there is any residual Matrigel, the amount of new adhesive should be at least 1.5 times the amount of residual adhesive
(4) Glue - dot plate
Matrigel (ABS9495) was added to the cell pellet, and the mixture was carried out by pipetting (do not blow full, it is easy to produce bubbles), and then the plate was spotted. The entire operation is carried out on a metal ice box or ice. After the operation is proficient, the glue is added, mixed evenly, and the dot plate is controlled within half a minute, which is conducive to maintaining the good fluency of the matrix glue.
(5) Add liquid
Put the lined culture plate into a 37 °C incubator for 40-60 min to form gelatin, and add 500-750 μl of human colorectal cancer organoid medium A for culture. In about 10-14 days, most organoids are 200-300um in diameter and can be passaged.
2. When the number of organoids is insufficient or the volume is small:
1. Organoid collection, blowing and washing
1) Aspirate the medium with a pipette, add 1-2ml of about 4°C organoid subculture buffer G per well, and gently blow off the Matrigel.
2) Pipette the organoids into cell clumps (pipetting can be stopped when there are more cell clumps observed under the sampling microscope);
3) Washing: 24-well plates, each 5 wells as a group, collected in a 15ml centrifuge tube, add organoid subculture buffer G to 14ml (the more buffers, the more fully the Matrigel is diluted, the easier it is to remove), stand at 4 °C for 40min or -20 °C for 5min (the purpose is to soften the matrigel, if the refrigerator has a strong thermal insulation effect, shorten the freezing time, and find the appropriate freezing time, The centrifuge tube can be taken out and shaken, and the Matrigel cannot be seen, indicating that the cooling is good).
4) Next, the centrifuge tube is centrifuge at 300g, 4°C, centrifugation for 5min, and there are usually these two situations after centrifugation:
The first is the normal situation, which is divided into three layers (as shown below), at which point the supernatant and Matrigel layer are discarded and the cell pellet can be retained.

The second is an abnormal situation, which is divided into two layers (as shown in the figure below), which may be related to insufficient cooling. At this time, discard the buffer, leave the Matrigel organoid suspension, repeat the previous washing step, cold centrifugation again, and there is usually clear stratification (buffer layer, Matrigel layer, organoid precipitation layer), at this time, discard the supernatant and Matrigel layer, and retain the organoid pellet. If there are still two layers (buffer layer and Matriglia cell suspension layer), discard the buffer and the top 1/3 of the Matriglia cell suspension and keep the bottom 2/3.

Conditions to facilitate efficient isolation of Matrigel and organoids:
a The choice of centrifuge is very important, and the horizontal angle centrifuge is more conducive to the separation of Matrigel and organoids than the fixed angle centrifuge;
b The temperature of the centrifuge should be 4 °C (to avoid the curing of Matrigel), the centrifugal speed can be appropriately increased (the maximum should not exceed 500g), and the centrifugation time can be appropriately extended (the most common is not more than 10min).
2. Add glue-dot plate-add liquid
(1) Preparation
A Matrigel needs to be stored in a metal ice box and melted overnight in a refrigerator at 4°C;
b Pipette heads and centrifuge tubes need to be pre-cooled at -20°C for at least half an hour in advance;
c The melted Matrigel can be stored at 4°C all the time, and it is recommended to use it up within 2 weeks.
(2) Vaccination requirements
24-well plate (abs7035), 25 μL Matrigel cell mass mix per well, 500-750 uL organoid culture medium
(3) Inoculation density
Density recommendation 1: For the case of a small number of organoids, in order to maintain the paracrine signal required for growth, 2-3 wells are required to enrich into 1 well, e.g., 6 wells are collected in 24-well plates, 1 well is enriched in 2 wells, and 3 wells are laid, and the amount of Matrigel required is 25*3=75uL
Density recommendation 2: 500 cell clusters/25 uL Matrigel (if you want to count the seeding, you can refer to this density recommendation).
Note: Regardless of whether it is recommended by density 1 or 2 by density, if there is any residual matrice, the amount of new adhesive is at least 1.5 times the amount of residual gel
(4) Glue - dot plate
Matrigel (ABS9495) was added to the cell pellet, and the mixture was carried out by pipetting (do not blow full, it is easy to produce bubbles), and then the plate was spotted. The entire operation is carried out on a metal ice box or ice. After the operation is proficient, the glue is added, mixed evenly, and the dot plate is controlled within half a minute, which is conducive to maintaining the good fluency of the matrix glue.
(5) Add liquid
Put the laid culture plate into a 37°C incubator for 40-60 min to form gelatin, and add 500-750μl organoid medium A for culture. In about 7-10 days, most organoids are 200-300um in diameter and can be passaged again.
Cryopreservation
Essentials of cryopreservation:
Organoids do not need to be digested (the recovery rate of digested organoids is low);
Cryopreservation during the exponential growth period of organoids (the activity of organoids is worse than that in the exponential period when it is passaged), that is, Day3-Day4 after passage, most organoids are 100um-200um in diameter, and cryopreservation is selected at this time.
1. Organoid collection and washing
1. Collection: Aspirate the medium with a pipette, add 1-2ml of about 4°C organoid subculture buffer G per well, gently blow off the Matrigel, and collect it in a 15ml centrifuge tube (24-well plate, every 5 wells as a group).
2. Washing: add organoid subculture buffer G to a fixed volume of 14ml (the more buffers, the more fully the Matrigel is diluted, the easier it is to remove), stand at 4 °C for 40min or -20 °C for 5min (the purpose is to soften the Matrigel, if the refrigerator has a strong thermal insulation effect, shorten the freezing time, and grope for the appropriate freezing time, you can take out the centrifuge tube and shake it to see the Matrigel, which means that the cooling is good).
3. Next, the centrifuge tube is centrifuge at 300g, 4°C, and centrifugation for 5min.
The first is the normal situation, which is divided into three layers (as shown below), at which point the supernatant and matrigel layer are discarded and the organoid pellet can be retained.

The second is an abnormal situation, which is divided into two layers (as shown below), which may be related to insufficient cooling. At this time, discard the buffer, leave the matrix colloid organoid suspension, repeat the previous washing step, cold centrifugation again, and usually clear stratification (buffer layer, matrigal layer, organoid precipitation layer), at this time, discard the supernatant and matrigel layer, and retain the organoid pellet. If there are still two layers (buffer layer and Matrigel organoid suspension layer), discard the buffer and the top 1/3 of Matrigel organoid suspension and keep the bottom 2/3.
Conditions to facilitate efficient isolation of Matrigel and organoids:
a The choice of centrifuge is very important, and the horizontal angle centrifuge is more conducive to the separation of Matrigel and organoids than the fixed angle centrifuge;
b The temperature of the centrifuge should be 4 °C (to avoid the curing of Matrigel), the centrifugal speed can be appropriately increased (the maximum should not exceed 500g), and the centrifugation time can be appropriately extended (the most common is not more than 10min).
2. Cryopreservation of organoids
1. Cryopreservation density, taking 24-well plates as an example
Density recommendation: 1:2 wells/mL cryopreservation solution
Density recommendation 2: 500 organoids/mL cryopreservation solution (if you want to count cryopreservation, you can refer to this density recommendation)
2. Add an appropriate amount of organoid cryopreservation solution F, gently blow and resuspend, and it is recommended to cryopreserve immediately. (If left for too long, DMSO will damage the organoids).
3. Gradient cryopreservation: put the cryopreservation tube into the gradient cryopreservation box and then store it at -80 °C overnight, and take it out and put it in the liquid nitrogen tank the next day.
Manual cryopreservation: 4°C freezer for 30 min, transfer to -20°C for 1h, then move to -80°C overnight, remove and put into liquid nitrogen tank the next day.
recovery
1. Preparation before the experiment
1. Preheat the water bath to 37°C;
2. Routine disinfection of the cell laboratory, spraying with preventive spray and irradiating ultraviolet light for 40min on the ultra-clean workbench;
3. Place the sterilized centrifuge tubes, straws, culture plates, etc. in order in the ultra-clean workbench.
2. Take out the cryopreservation tube
1. Find the number of the required organoids according to the label according to the organoid cryopreservation record.
2. Take out the cryopreservation box from the liquid nitrogen tank, take out the required cryopreservation tube, and check the number outside the cryopreservation tube at the same time.
3. Thaw quickly
1. Quickly put the cryopreservation tube into the preheated water bath to thaw, and shake it constantly to make the liquid in the tube melt quickly.
2. After about 1-2min, the liquid in the cryopreservation tube is completely dissolved, take it out and wipe the outer wall of the cryopreservation tube with an alcohol cotton ball, and then take it into the ultra-clean table.
4. Transfer the organoid cryopreservation solution into a 15ml centrifuge tube, add 10 times the volume of organoid subculture buffer G (buffer volume: cryopreservation fluid volume = 10:1) to resuspend, gently pipette and mix well, centrifuge at 300g at 4°C for 5min, and discard the supernatant.
5. Add glue - spot plate - add liquid
1. Preparation
(1) Matrigel needs to be stored in a metal ice box and melted overnight in a refrigerator at 4°C
(2) Pipette heads and centrifuge tubes need to be pre-cooled at -20°C for at least half an hour in advance
(3) The melted matrigel can be stored at 4°C all the time, and it is recommended to use it up within 2 weeks
2. Recovery requirements
24-well plate (ABS7035), 25 μL Matrigel organoid mix per well, 500-750 μL organoid culture
3. Resuscitation density
The resuscitation density is recommended to be inoculated at a ratio of 1:1:1 (resuscitation of a few wells after a few frozen wells).
Recommended recovery density 2: 250 organoids/25 uL Matrigel (if you want to count the seeding, you can refer to this density recommendation).
4. Add glue to the dot plate
Matrigel (ABS9495) was added to the organoid pellet, and the mixture was carried out by pipetting (do not blow full, it is easy to produce bubbles), and then the plate was spotted. The entire operation is carried out on a metal ice box or ice. After the operation is proficient, the glue is added, mixed evenly, and the dot plate is controlled within half a minute, which is conducive to maintaining the good fluency of the matrix glue.
5. Add liquid
Put the laid culture plate into a 37°C incubator for 40-60 min to form gelatin, and add 500-750μl organoid medium A for culture. About 10-14 days, most organoids are 200um-500um in diameter and can be passaged.
Key considerations
1. Matrigel operation: the whole process is operated on ice to avoid early curing.
2. Density control: 85-90% of the cells need to be fused before endoderm differentiation, otherwise the formation of spheroids will be affected.
3. Growth factor activity: use freshly prepared or preserved factors to avoid repeated freezing and thawing.
4. Pollution prevention and control: aseptic operation, regular detection of mycoplasma.
Troubleshooting
| issue | Possible causes | solution |
| The endoderm differentiation efficiency is low | Activin A inactivated/cells are over-dense | Replace Activin A and adjust the cell density |
| Globular body agenesis | FGF4/WNT3a | Verify factor activity and optimize concentration |
| Organoid growth arrest | Matrigel is too thin/growth factor is missing | Reduce medium dilution and supplement with Rspondin1/Noggin |
By following the above steps and optimizing the details, functional human intestinal organoids can be efficiently generated, which are suitable for disease modeling, drug screening, and other research.
That's all for today's explanation, if you have experimental questions, welcome to join the group to communicate!

This issue is recommended by Xiaoai
|
Catalog number |
Name |
specification |
|
ABS9403 |
Human pluripotent stem cell medium |
500ml |
|
ABS9409 |
Human pluripotent stem cell digestive juice |
100mL |
|
ABS9295 |
L-alanyl-L-glutamine solution (100×, 200mM) |
100mL |
|
ABS9412 |
ES/iPS cell cryopreservation |
100mL |
|
Ready-to-use Matrigel |
100mL |
|
|
ABS9484 |
RPMI 1640 |
500mL |
|
Bispecific antibodies |
100mL |
|
|
ABS05801 |
Activin A |
10ug |
|
ABS06269 |
FGF4 |
50ug |
|
ABS05632 |
WNT3a |
50ug |
|
Matrigel (low factor, phenol red-free) |
1.5ml*8 |
|
|
ABS945 |
Dialysis of fetal bovine serum |
500mL |
|
ABS9545 |
Human Normal Intestinal Organoid Culture Kit |
1kit |
|
ABS7289 |
2mL cryogenic metal ice box (24-well, flat bottom) |
1 pc |
|
ABS7033 |
Cell culture plates (standard clear 6-well plates) |
50pcs/carton |
|
ABS7035 |
Cell culture plates (standard clear 24-well plates) |
1 box |
|
ABS7164 |
Cell cryovials |
1 box |
|
ABS7053 |
10 mL disposable pipettes |
1 box |
|
ABS7054 |
25 mL disposable pipette |
1 box |
Absin provides antibodies, proteins, ELISA kits, cell culture, detection kits, and other research reagents. If you have any product needs, please contact us.
|
Absin Bioscience Inc. |
 Follow us on Facebook: Absin Bio Follow us on Facebook: Absin Bio |


