IPS-Induced Brain Organoid Cultivation Strategy(Part Ⅱ)

The culture of IPS-induced brain organoids is divided into two major stages: differentiation of pluripotent stem cells into neural stem cells, induction of neural stem cells to form brain organoids.
I. Methods for Human Pluripotent Stem Cell Culture
I. Experimental Preparation
1. Preparation of Human Pluripotent Stem Cell Culture Medium
(1) Thaw hPSC Medium Supplement at 2-8℃. After thawing, mix well by shaking up and down. Aliquot according to the actual usage and use immediately or store at -20~-80℃ to avoid repeated freeze-thaw cycles;
(2) Mix hPSC Medium Supplement (10mL) with hPSC Medium Basal Medium (500mL) at a ratio of 1:50. Mix well to obtain Human Pluripotent Stem Cell Culture Medium;
Note: The mixed Human Pluripotent Stem Cell Culture Medium can be stably stored at 2-8℃ for 2-3 weeks. It is not recommended to use Human Pluripotent Stem Cell Culture Medium that has been prepared for more than 3 weeks.
(3) Reagent Equilibration: Equilibrate Human Pluripotent Stem Cell Culture Medium to room temperature away from light before the experiment; equilibrate PBS, dissociation solution, etc., at 37℃.
Note: Do not heat the culture medium containing factors in a 37℃ water bath.
II. Operating Procedures (All steps below should be performed under sterile conditions)
Thawing of hPSC Cells:
1. Experimental Procedure:
1.1. Matrix Gel Coating of Culture Plates: Remove 6-well/12-well plates and add 1mL/0.5mL of ready-to-use matrix gel (abs9410) to each well. Gently shake the 6-well/12-well plates to ensure the matrix gel completely covers the bottom of the wells. Incubate in a 37℃ incubator for 1-2 hours. Before the experiment, remove the plates and balance them at room temperature in a biosafety cabinet/laminar flow hood for 20 minutes. If not used temporarily, seal with Parafilm and store at 2-8℃, and use within 1 week.
Note:
① The number of cells in a cryopreserved stem cell vial is approximately 1×10⁶ cells/mL, corresponding to one well of a 6-well plate;
② Ready-to-use matrix gel is temperature-sensitive. Take it out as needed and immediately return it to the 4℃ refrigerator after use. Do not touch the part of the bottle that comes into contact with the matrix gel liquid with your hands, as it may affect the quality of the matrix gel.
1.2. First, add 2-3mL of stem cell culture medium to a 15mL centrifuge tube and set aside.
1.3. Thawing: Quickly immerse the cryovial retrieved from liquid nitrogen into 37℃ warm water, and rapidly agitate to thaw within 1-2 minutes;
Note: The speed of removing cells from liquid nitrogen should be fast, and the exposure time of cells to room temperature should be minimized as much as possible.
1.4. Centrifugation: After the cryopreserved medium in the vial is thawed, slowly add it dropwise to the 15mL centrifuge tube containing the stem cell culture medium. Centrifuge the 15mL centrifuge tube in a low-speed centrifuge at 1000rpm for 3 minutes after balancing;
1.5. Resuspension: After centrifugation, discard the supernatant and resuspend the stem cell pellet by pipetting up and down with 1mL of Human Pluripotent Stem Cell Culture Medium, about 3-5 times.
1.6. Seeding: After mixing evenly, discard the equilibrated ready-to-use matrix gel, and add the resuspended stem cell suspension to the coated 6-well plate, and supplement each well with 2mL of culture medium.
1.7. Culture: The seeded 6-well plate can be observed under an inverted phase-contrast microscope to check the density of the seeded stem cells and the size of the cell clusters. Qualified clusters should consist of more than four cells. Gently shake the 6-well/12-well plate horizontally in a cross pattern to distribute the cells evenly. Incubate in a constant temperature incubator at 37℃ and 5% CO2. Observe the cell attachment the next day;
1.8. Medium Change: Change the medium every 24 hours starting from the time of cell recovery.
Note: Since the active components in the medium are only sufficient to sustain the cells for one day, it is necessary to replace the medium with fresh medium every 24 hours promptly.

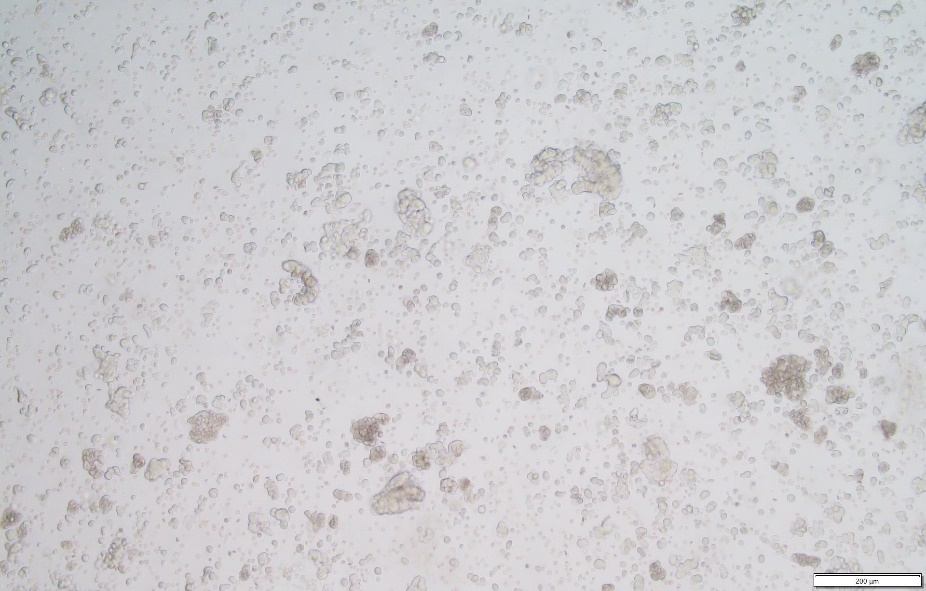
Pluripotent Stem Cell (PSC) Colonies
hPSC Cell Passaging:
2. Specific Experimental Procedure:
2.1. Washing: Aspirate the existing culture medium, slowly add 1mL of PBS buffer along the wall of the dish, gently shake, and then aspirate the PBS buffer along the edge of the culture dish;
2.2. Digestion: Add 2mL/well of Human Pluripotent Stem Cell Dissociation Solution to the 6-well plate to cover the bottom of the wells, and incubate in a 37℃ incubator for 2-5 minutes;
Note: The digestion time depends on the growth density of the stem cells, and the time may vary. Generally, it is recommended to digest for 2-5 minutes. During digestion, the cells can be observed under an inverted microscope. When most of the edges of the clones and the cells inside the clones show gaps, the digestion can be stopped by aspirating the digestion solution.
2.3. Pipetting: After aspirating the digestion solution, add 2mL of Human Pluripotent Stem Cell Culture Medium and gently pipette the bottom of the culture dish in a fan-shaped manner, about 3-5 times, to detach the stem cell clusters from the dish and transfer them to a 15mL centrifuge tube;
Note: The force applied to pipette the cells should be gentle. It is advisable to pipette 3-5 times to detach the cells and mix them. Single cells should be avoided as much as possible. If a small amount of cells cannot be detached from the dish, it is normal. If a large number of cells cannot be detached, the digestion time should be extended.
2.4. Centrifugation: Centrifuge at 1000rpm for 3 minutes, discard the supernatant;
2.5. Seeding: Resuspend the cells by pipetting with stem cell culture medium 5-10 times, aspirate the matrix gel from the coated culture dish, and add the cell suspension to the culture dish, supplementing each well with 2mL of culture medium.
Note: Pipetting should be gentle, and the number of pipetting times should not exceed 10.
2.6. Medium Change: Starting from the time of passaging, change the medium every 24 hours.
Note: Since the active components in the medium are only sufficient to maintain the cells for one day, it is important to replace the medium with fresh medium every 24 hours.

Staining of Pluripotent Stem Cell (PSC) Colonies
Freezing of hPSC Cells:
3. Specific Experimental Procedure:
3.1. Washing: Same as 2.1;
3.2. Digestion: Same as 2.2;
3.3. Pipetting: Same as 2.3;
3.4. Centrifugation: Same as 2.4;
3.5. Resuspension: After centrifugation, discard the supernatant and resuspend the stem cell pellet by pipetting with 2mL of ES/iPS Cell Freezing Medium (abs9412). Pipette 3-5 times and transfer to a freezing vial;
Note: The freezing medium should be taken out as needed and promptly returned to the 4℃ refrigerator.
3.6. Recording: Label the freezing vial with the type of cells, date, operator, and cell batch.
3.7. Freezing in a -80℃ Freezer: Place the freezing vial in a -80℃ freezer overnight.
Note: When placing the freezing vial in the -80℃ freezer, it should be positioned upright. Avoid placing the vial at an angle or horizontally.
3.8. Liquid Nitrogen Freezing: After 24 hours, transfer the cells from the -80℃ freezer to liquid nitrogen for long-term storage.
II. Methods for Inducing Human Pluripotent Stem Cells to Differentiate into Neural Stem Cells
Preparation of Induction Medium
1. Thaw the frozen PSC supplement overnight at 2℃-8℃, or quickly thaw in a 37℃ water bath for about 5 minutes.
2. After thawing, the supplement can be aliquoted into multiple identical portions and stored at -5℃ to -20℃ for preparing smaller volumes of complete medium. Do not refreeze.
3. Gently invert the vial several times to mix the thawed supplement.
4. Take 20mL of PSC supplement from the bottle and transfer it to the PSC culture medium bottle. Rotate the bottle to mix, and obtain 500mL of Human Pluripotent Stem Cell (PSC) Induction Neural Stem Medium, referred to as induction medium.
5. The induction medium can be stored at 2℃-8℃ for 2 weeks. Before use, preheat the required amount of complete medium for the day in a 37℃ water bath for 5-10 minutes.
Preparation of PSC Cells
1. Follow the steps for Human Pluripotent Stem Cell Culture—Thawing of hPSC Cells—1.1-1.8 to recover PSCs.
2. When PSCs reach 70-80% confluence, remove any differentiated and partially differentiated clones.
3. Perform passaging operations on PSCs according to the steps for Human Pluripotent Stem Cell Culture—Passaging of hPSC Cells—2.1-2.4.
4. Aspirate the coating solution from newly coated 6-well plates and add 2.5mL of induction medium to each well.
5. Gently shake the centrifuge tube containing the induced cell suspension and add PSCs to the coated 6-well plates at a density of 2.5×10⁵ - 3×10⁵ cells per well. For example, if the cell cluster concentration in the PSC suspension is 1×10⁶ cells/mL, add 0.25-0.3mL of induction medium to each well.
6. Quickly move the culture dish back and forth to disperse the cells on the surface of the dish and place it gently in a 37℃ incubator with 5% CO2.
Note:When passaging PSCs, the cells should be seeded as small clusters rather than as a single-cell suspension. Avoid seeding PSCs as single cells, as this can lead to increased cell death.
Note: You can add 10μM ROCK inhibitor Y27632 to the PSC culture medium overnight during division to prevent cell death.
Neural Induction
1. Preheat the induction medium to room temperature.
2. On day 0 of neural induction (approximately 24 hours after PSC passaging), PSCs should reach 15-25% confluence. Aspirate the spent medium and add 2.5mL of preheated induction medium to each well of the 6-well plate. Place the culture dish in a 37℃ incubator with 5% CO2.
3. On day 2 of neural induction, the morphology of the cell colonies should be uniform. Mark any non-neural differentiated clones and remove them using a Pasteur pipette or pipette tip if present. Aspirate the spent medium and add 2.5mL of preheated induction medium to each well of the 6-well plate. Return the culture dish to the incubator.
4. On day 4 of neural induction, the cells will reach confluence. Any non-neural differentiated clones should be marked and removed. Aspirate the spent medium from each well and replace it with 5mL of preheated induction medium. Return the culture dish to the incubator.
5. On day 6 of neural induction, the cells should be near maximum confluence. Remove any non-neural differentiated clones and add 5mL of preheated induction medium to each well. Return the culture dish to the incubator.
Note: From days 4-7 of neural induction, if the cell color turns brown and there are many floating cells, it indicates that the initial density of PSCs is too high. In this case, change the medium daily and add 5mL of induction medium to each well.
6. On day 7 of neural induction, NSCs (P0) are ready for harvesting and passaging.
III. Methods for Human Neural Stem Cell Culture
Preparation of Complete Culture Medium for Neural Stem Cell (NSC) Expansion
1. The complete culture medium for NSC requires supplementation with NSC supplement and L-alanyl-L-glutamine.
2. In a sterile environment, sequentially add 20mL of NSC supplement and 5mL of 200mM L-alanyl-L-glutamine (final concentration of 2mM) to 480mL of NSC culture medium. This yields Neural Stem Cell (NSC) Expansion Complete Culture Medium.
3. (Optional) Add 10mL/L of antibiotic solution (penicillin-streptomycin).
Note:Store within the validity period of all components in a dark environment at 2℃ to 8℃ for up to 4 weeks.
Note: The addition of 200μM ascorbic acid is optional, especially for suspension culture.
Coating of Culture Plates
1. Matrix Gel Coating of Culture Plates: Remove 6-well/12-well plates and add 1mL/0.5mL of ready-to-use matrix gel (abs9410) to each well. Gently shake the 6-well/12-well plates to ensure the matrix gel completely covers the bottom of the wells. Incubate in a 37℃ incubator for 1-2 hours. Before the experiment, remove the plates and balance them at room temperature in a biosafety cabinet/laminar flow hood for 20 minutes. If not used temporarily, seal with Parafilm and store at 2-8℃, and use within 1 week.
2. Before use, discard the equilibrated ready-to-use matrix gel and add preheated complete NSC culture medium.
NSC Passaging
1. When the cell density reaches 90-100% confluence, discard the culture medium from the culture flask.
2. Wash the cells with 5mL of pre-warmed DPBS without calcium and magnesium, then aspirate the solution.
3. Add 1.0mL of pre-warmed Human Pluripotent Stem Cell Dissociation Solution to each culture flask and incubate at room temperature for 2-5 minutes. Ensure complete coverage of the cells before incubation.
4. Observe under an inverted microscope whether the cells have detached. If necessary, gently tap the culture flask to promote cell detachment.
5. Gently pipette up and down to disperse the clusters into a single-cell suspension.
6. Add 9mL of pre-warmed NSC complete culture medium to stop the cell dissociation reaction, then transfer the cell suspension to a sterile centrifuge tube.
7. Centrifuge at 200×g for 4 minutes.
8. Discard the supernatant and resuspend the cell pellet with an appropriate amount of NSC complete culture medium.
9. Determine the total viable cell density using an automated cell counter.
10. Remove the overlay solution from each culture flask and add 5mL of pre-warmed NSC complete culture medium with Y27632 (final concentration of 10μM).
11. Add 5×10⁴ cells/cm2 (e.g., 1.25×10⁶ cells for a T-25 culture flask), then mix or rotate the cell suspension to ensure even distribution.
12. Incubate in a humidified environment at 37℃ and 5% CO2.
Note: To achieve optimal performance and cell growth, change the medium every 2-3 days with fresh pre-warmed NSC complete culture medium.
NSC Freezing
1. Prepare stem cell freezing medium.
2. Collect cells for freezing according to steps 1-7 of "NSC Passaging."
3. During centrifugation, calculate the cell density required for a final volume of 2×10⁶ viable cells/mL.
Note: The following steps require half the volume of room temperature NSC culture medium and half the volume of freezing medium.
4. Discard the supernatant and resuspend the cells with NSC complete culture medium.
5. Add an equal volume of freezing medium to achieve a final concentration of 10% DMSO.
6. Immediately aliquot the cell suspension into freezing vials (1mL per vial).
7. Use a programmed freezing device (with automatic or manual rate control) to achieve cryopreservation by lowering the temperature at a rate of 1℃ per minute.
8. Transfer the frozen cells to liquid nitrogen.
NSC Thawing
1. Rapidly thaw the cells in a 37℃ water bath (<2 minutes).
2. Transfer the entire contents of the cryovial to a sterile 15mL centrifuge tube using a pipette.
3. Carefully add (1 drop per second) 4mL of pre-warmed NSC complete culture medium and gently rotate the centrifuge tube to mix.
4. Continue to add pre-warmed NSC complete culture medium to a total volume of 10mL.
5. Centrifuge at 200×g for 4 minutes, confirm cell pellet formation, and discard the supernatant.
6. Resuspend the cell pellet with 5mL of pre-warmed NSC complete culture medium, then add Y27632 (final concentration of 10μM), and transfer the entire contents of the centrifuge tube to a coated tissue culture flask.
7. Incubate in a humidified environment at 37℃ and 5% CO2.
8. Replace the medium with fresh pre-warmed NSC complete culture medium 24 hours after thawing.
Note: To re-establish cell growth in NSC, we recommend seeding cells at a density of ≥1×10⁵ cells/cm2 during the initial passage.
IV. Induction of Human Neural Stem Cells to Form Brain Organoids
Primary
I. Preparatory Work
1. Instruments and Equipment
CO2 incubator, double-person single-sided laminar flow hood, inverted microscope, benchtop refrigerated centrifuge, water bath or water bath shaker, medical refrigerator, -80℃ freezer, a set of pipettes.
2. Reagents and Consumables (Taking Colorectal Cancer as an Example)
Animal Brain Organoid Culture Kit (abs90050), matrix gel (low factor, phenol red-free) (abs9495), 15mL centrifuge tubes, several 1.5mL EP tubes, 24-well cell culture plates, metal ice box.
|
Component Name |
Specification |
|
Animal Brain Organoid Culture Medium A |
100mL |
|
Primary Organoid Culture Buffer B |
250mL |
|
Primary Tissue Dissociation Solution C |
30mL |
|
Organoid Passaging Dissociation Solution D |
30mL |
|
Tissue Preservation Solution E |
100mL |
|
Organoid Freezing Solution F |
20mL |
|
Organoid Passaging Culture Buffer G |
250mL |
II. Operating Procedure
1. Loading Matrix - Plating - Adding Medium (This is the highlight of the entire primary operation)
(1) Preparation
a. The matrix gel should be placed in a metal ice bucket and stored in a 4℃ refrigerator to thaw overnight.
b. Pipette tips and centrifuge tubes need to be pre-cooled at -20℃ for at least half an hour.
c. Once thawed, the matrix gel can be stored at 4℃ continuously, and it is recommended to use it within 2 weeks.
(2) Seeding Requirements
24-well plate, 25uL matrix gel cell cluster mixture per well, 500-750uL organoid culture medium
(3) Seeding Density

Stem Cell Cluster Sedimentation
Collect and centrifuge neural stem cell clusters at 300g, 4℃ for 5 minutes, then remove the supernatant.
Density Suggestion 1: Matrix Gel Volume : Cell Cluster Sedimentation Volume = 25:1 (If it is difficult to estimate the volume of cell cluster sedimentation, adding 300uL of matrix gel is usually sufficient)
Density Suggestion 2: 500 cell clusters/25uL matrix gel (If counting before seeding is desired, this density suggestion can be referenced)
(4) Loading Matrix - Plating
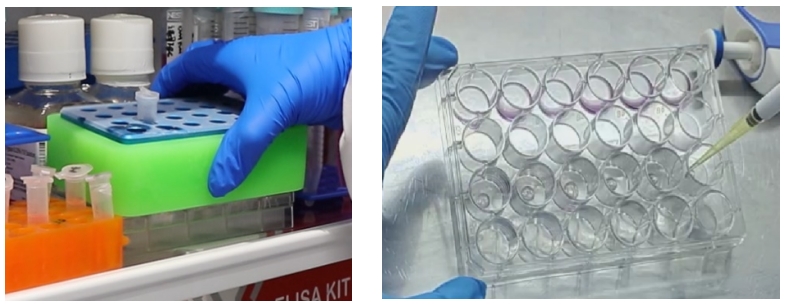
Add matrix gel (abs9495) to the cell cluster sedimentation and mix by pipetting (Do not over-pipette to avoid excessive bubbles), then proceed to plating. All operations should be conducted on a metal ice bucket or ice. Once proficient, the entire process of loading matrix, mixing, and plating should be completed within half a minute to maintain the good fluidity of the matrix gel.
(5) Adding Medium
Place the prepared culture plate in a 37℃ incubator for 40-60 minutes to gel, and add 500-750μL of Organoid Culture Medium A for cultivation. After approximately 10-14 days, most organoids will have a diameter of 200um-500um and can be passaged.

Plating Density
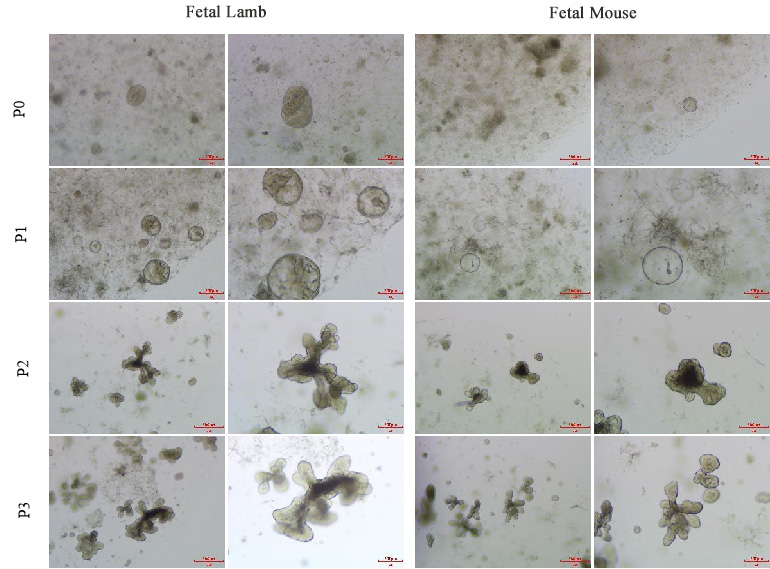
Fetal Sheep and Fetal Mouse Organoid Growth Diagram
Passaging (Dissociation in Two Scenarios)
I. Passaging Steps for Organoids with Larger Numbers or Volume
1. Organoid Collection and Washing
1) Collection: Aspirate the culture medium using a pipette and add approximately 1-2mL of 4℃ Organoid Passaging Culture Buffer G to each well. Gently disperse the matrix gel and collect in a 15mL centrifuge tube (for 24-well plates, collect 5 wells as a group).

2) Washing: Add Organoid Passaging Culture Buffer G to a final volume of 14mL (the more buffer used, the more thoroughly the matrix gel is diluted and easier to remove), incubate at 4℃ for 40 minutes or place at -20℃ for 5 minutes (the purpose is to soften the matrix gel. If the refrigerator has strong insulation, shorten the freezing time. When determining the appropriate freezing time, remove the centrifuge tube and shake it. If the matrix gel is no longer visible, it is sufficiently chilled).
3) Centrifuge the tube at 300g, 4℃ for 5 minutes. Typically, two scenarios will occur after centrifugation:
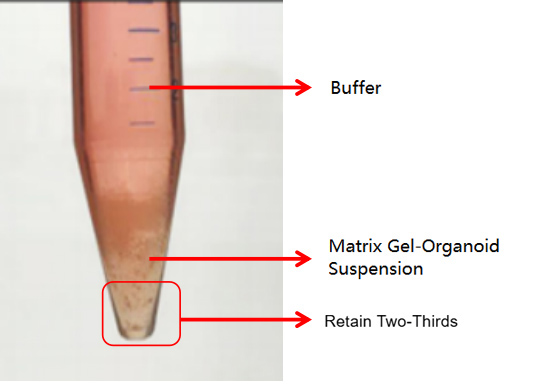
The first is the normal case, where three layers are formed (as shown in the figure below). In this case, discard the supernatant and matrix gel layer, and retain the organoid sediment.

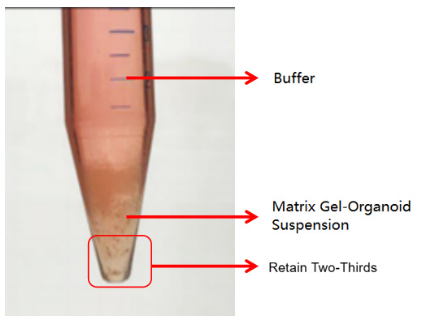
The second is an abnormal case, where two layers are formed (as shown in the figure below). This situation may be related to insufficient chilling. In this case, discard the buffer and retain the matrix gel-organoid suspension. Repeat the washing step and centrifuge again after chilling. Typically, clear layers (buffer layer, matrix gel layer, organoid sediment layer) will form. Discard the supernatant and matrix gel layer, and retain the organoid sediment. If it still appears as two layers (buffer layer and matrix gel-organoid suspension layer), discard the buffer and the top 1/3 of the matrix gel-organoid suspension, and retain the bottom 2/3.
Conditions for Effective Separation of Matrix Gel and Organoids:
a. The choice of centrifuge is crucial. A horizontal angle centrifuge is more effective than a fixed-angle centrifuge for separating matrix gel and organoids.
b. The temperature of the centrifuge should ideally be 4℃ (to prevent matrix gel solidification), the centrifugation speed can be appropriately increased (not exceeding 500g), and the centrifugation time can be extended as needed (not exceeding 10 minutes).
2. Organoid Dissociation
1) Add 2-3mL of Organoid Passaging Dissociation Solution D and digest in a biosafety cabinet for 2-3 minutes, pipetting 1-2 times during digestion. This step aims to dissociate the organoids into cell clusters; never digest them into single cells, as single-cell organoids have a low survival rate. If uncertain about the digestion progress, aspirate a few microliters for microscopic observation. If numerous cell clusters are visible, stop the digestion.
2) Add five times the volume of Organoid Passaging Culture Buffer G (buffer to dissociation solution ratio = 5:1) to terminate the digestion. Centrifuge at 300g, 4℃ for 5 minutes, and discard the supernatant (if matrix gel residue is present, a residual volume <50uL is normal and does not affect organoid proliferation).

3. Loading Gel - Plating - Adding Medium
(1) Preparation
a. Matrix gel should be placed in a metal ice bucket and stored in a 4℃ refrigerator to thaw overnight.
b. Pipette tips and centrifuge tubes need to be pre-cooled at -20℃ for at least half an hour.
c. Once thawed, the matrix gel can be stored at 4℃ continuously, and it is recommended to use it within 2 weeks.
(2) Seeding Requirements
24-well plate (abs7035), 25uL matrix gel cell cluster mixture per well, 500-750uL organoid culture medium
(3) Seeding Density
Density Suggestion 1: Organoids are typically passaged at a ratio of 1:2. For example, if 5 wells of a 24-well plate are collected, they can be passaged into 10 wells, requiring 250uL of matrix gel (25uL x 10).
Density Suggestion 2: 500 cell clusters/25uL matrix gel (If counting before seeding is desired, this density suggestion can be referenced)
Note: Whether following Density Suggestion 1 or 2, if there is residual matrix gel, the volume of new gel should be at least 1.5 times the volume of the residual gel.
(4) Loading Gel - Plating
Add matrix gel (abs9495) to the cell cluster sediment and mix by pipetting (Do not over-pipette to avoid excessive bubbles), then proceed to plating. All operations should be conducted on a metal ice bucket or ice. Once proficient, the entire process of loading gel, mixing, and plating should be completed within half a minute to maintain the good fluidity of the matrix gel.
(5) Adding Medium
Place the prepared culture plate in a 37℃ incubator for 40-60 minutes to gel, and add 500-750μL of Human Colorectal Cancer Organoid Culture Medium A for cultivation. After approximately 10-14 days, most organoids will have a diameter of 200-300um and can be passaged.
II. When Organoid Quantity is Insufficient or Volume is Small:
1. Organoid Collection, Pipetting, and Washing
1) Aspirate the culture medium using a pipette and add approximately 1-2mL of 4℃ Organoid Passaging Culture Buffer G to each well, gently dispersing the matrix gel.
2) Pipette to dissociate the organoids into cell clusters (Sampling and microscopic observation can be performed to check for a sufficient number of cell clusters, at which point pipetting can be stopped);
3) Washing: For 24-well plates, collect every 5 wells in a 15mL centrifuge tube, add Organoid Passaging Culture Buffer G to a final volume of 14mL (The more buffer used, the more thoroughly the matrix gel is diluted and easier to remove), incubate at 4℃ for 40 minutes or place at -20℃ for 5 minutes (The purpose is to soften the matrix gel. If the refrigerator has strong insulation, shorten the freezing time. When determining the appropriate freezing time, remove the centrifuge tube and shake it. If the matrix gel is no longer visible, it is sufficiently chilled).
4) Centrifuge the tube at 300g, 4℃ for 5 minutes. Typically, two scenarios will occur after centrifugation:
The first is the normal case, where three layers are formed (as shown in the figure below). In this case, discard the supernatant and matrix gel layer, and retain the cell cluster sediment.

The second is an abnormal case, where two layers are formed (as shown in the figure below). This situation may be related to insufficient chilling. In this case, discard the buffer and retain the matrix gel-organoid suspension. Repeat the washing step and centrifuge again after chilling. Typically, clear layers (buffer layer, matrix gel layer, organoid sediment layer) will form. Discard the supernatant and matrix gel layer, and retain the organoid sediment. If it still appears as two layers (buffer layer and matrix gel-cell cluster suspension layer), discard the buffer and the top 1/3 of the matrix gel-cell cluster suspension, and retain the bottom 2/3.

Conditions for Effective Separation of Matrix Gel and Organoids:
a. The choice of centrifuge is crucial. A horizontal angle centrifuge is more effective than a fixed-angle centrifuge for separating matrix gel and organoids.
b. The temperature of the centrifuge should ideally be 4℃ (to prevent matrix gel solidification), the centrifugation speed can be appropriately increased (not exceeding 500g), and the centrifugation time can be extended as needed (not exceeding 10 minutes).
2. Loading Gel - Plating - Adding Medium
(1) Preparation
a. Matrix gel should be placed in a metal ice bucket and stored in a 4℃ refrigerator to thaw overnight.
b. Pipette tips and centrifuge tubes need to be pre-cooled at -20℃ for at least half an hour.
c. Once thawed, the matrix gel can be stored at 4℃ continuously, and it is recommended to use it within 2 weeks.
(2) Seeding Requirements
24-well plate, 25uL matrix gel cell cluster mixture per well, 500-750uL organoid culture medium
(3) Seeding Density
Density Suggestion 1: For cases with a smaller number of organoids, to maintain the required paracrine signals for growth, 2-3 wells should be enriched into 1 well. For example, if 6 wells of a 24-well plate are collected, 2 wells can be enriched into 1 well,铺3孔, the required volume of matrix gel is 25*3=75uL
Density Suggestion 2: 500 cell clusters/25uL matrix gel (If counting before seeding is desired, this density suggestion can be referenced)
Note: Whether following Density Suggestion 1 or 2, if there is residual matrix gel, the volume of new gel should be at least 1.5 times the volume of the residual gel.
(4) Loading Gel - Plating
Add matrix gel (abs9495) to the cell cluster sediment and mix by pipetting (Do not over-pipette to avoid excessive bubbles), then proceed to plating. All operations should be conducted on a metal ice bucket or ice. Once proficient, the entire process of loading gel, mixing, and plating should be completed within half a minute to maintain the good fluidity of the matrix gel.
(5) Adding Medium
Place the prepared culture plate in a 37℃ incubator for 40-60 minutes to gel, and add 500-750μL of Organoid Culture Medium A for cultivation. After approximately 7-10 days, most organoids will have a diameter of 200-300um and can be passaged again.
Cryopreservation
Key Points for Cryopreservation:
Organoids do not require dissociation (the survival rate of dissociated organoids after thawing is low);
Cryopreserve organoids during their exponential growth phase (the viability of organoids during passaging is lower than in the exponential growth phase), typically on Day 3-Day 4 after passaging, when most organoids have a diameter of 100um-200um. This is the optimal time for cryopreservation.
I. Organoid Collection and Washing
1. Collection: Aspirate the culture medium using a pipette and add approximately 1-2mL of 4℃ Organoid Passaging Culture Buffer G to each well. Gently disperse the matrix gel and collect in a 15mL centrifuge tube (for 24-well plates, collect 5 wells as a group).

2. Washing: Add Organoid Passaging Culture Buffer G to a final volume of 14mL (the more buffer used, the more thoroughly the matrix gel is diluted and easier to remove), incubate at 4℃ for 40 minutes or place at -20℃ for 5 minutes (the purpose is to soften the matrix gel. If the refrigerator has strong insulation, shorten the freezing time. When determining the appropriate freezing time, remove the centrifuge tube and shake it. If the matrix gel is no longer visible, it is sufficiently chilled).
3. Centrifuge the tube at 300g, 4℃ for 5 minutes. Typically, two scenarios will occur after centrifugation:
The first is the normal case, where three layers are formed (as shown in the figure below). In this case, discard the supernatant and matrix gel layer, and retain the organoid sediment.

The second is an abnormal case, where two layers are formed (as shown in the figure below). This situation may be related to insufficient chilling. In this case, discard the buffer and retain the matrix gel-organoid suspension. Repeat the washing step and centrifuge again after chilling. Typically, clear layers (buffer layer, matrix gel layer, organoid sediment layer) will form. Discard the supernatant and matrix gel layer, and retain the organoid sediment. If it still appears as two layers (buffer layer and matrix gel-organoid suspension layer), discard the buffer and the top 1/3 of the matrix gel-organoid suspension, and retain the bottom 2/3.
Conditions for Effective Separation of Matrix Gel and Organoids:
a. The choice of centrifuge is crucial. A horizontal angle centrifuge is more effective than a fixed-angle centrifuge for separating matrix gel and organoids.
b. The temperature of the centrifuge should ideally be 4℃ (to prevent matrix gel solidification), the centrifugation speed can be appropriately increased (not exceeding 500g), and the centrifugation time can be extended as needed (not exceeding 10 minutes).
II. Organoid Cryopreservation
1. Cryopreservation Density, using a 24-well plate as an example
Density Suggestion 1: 2 wells/mL cryopreservation medium
Density Suggestion 2: 500 organoids/mL cryopreservation medium (If counting before cryopreservation is desired, this density suggestion can be referenced)
2. Add an appropriate amount of Organoid Cryopreservation Medium F, gently pipette to resuspend, and it is recommended to proceed with cryopreservation immediately. (Prolonged storage may cause DMSO to damage the organoids)
3. Gradient Cryopreservation: Place the cryovial in a gradient freezing box and store at -80℃ overnight. The next day, transfer it to a liquid nitrogen container.
Manual Cryopreservation: Incubate in a 4℃ refrigerator for 30 minutes, transfer to -20℃ for 1 hour, then move to -80℃ overnight. The next day, transfer it to a liquid nitrogen container.
Thawing
I. Preparations Before the Experiment
1. Preheat the water bath to 37℃;
2. Perform routine disinfection in the cell laboratory, spray the biosafety cabinet surface with preventive spray, and irradiate with ultraviolet light for 40 minutes;
3. Arrange sterilized centrifuge tubes, pipettes, culture plates, etc., in order within the biosafety cabinet.
II. Retrieving Cryovials
1. Locate the required organoid number according to the cryopreservation records based on the label.
2. Remove the cryovial box from the liquid nitrogen container, take out the required cryovial, and verify the number on the cryovial.
III. Rapid Thawing
1. Quickly immerse the cryovial in the preheated water bath and continuously shake to rapidly thaw the contents.
2. After approximately 1-2 minutes, when the contents of the cryovial are completely dissolved, remove it, wipe the outer wall with an alcohol swab, and transfer it into the biosafety cabinet.
IV. Transfer the organoid cryopreservation medium to a 15mL centrifuge tube, add 10 times the volume of Organoid Passaging Culture Buffer G (buffer volume : cryopreservation medium volume = 10:1) to resuspend, gently pipette to mix, centrifuge at 300g, 4℃ for 5 minutes, and discard the supernatant.
V. Loading Gel - Plating - Adding Medium
1. Preparation
(1) Matrix gel should be placed in a metal ice bucket and stored in a 4℃ refrigerator to thaw overnight.
(2) Pipette tips and centrifuge tubes need to be pre-cooled at -20℃ for at least half an hour.
(3) Once thawed, the matrix gel can be stored at 4℃ continuously, and it is recommended to use it within 2 weeks.
2. Thawing Requirements
24-well plate, 25uL matrix gel-organoid mixture per well, 500-750uL organoid culture medium
3. Thawing Density
Thawing Density Suggestion 1: 1:1 seeding (thaw as many wells as were originally frozen)
Thawing Density Suggestion 2: 250 organoids/25uL matrix gel (If counting before seeding is desired, this density suggestion can be referenced)
4. Loading Gel - Plating
Add matrix gel (abs9495) to the organoid sediment and mix by pipetting (Do not over-pipette to avoid excessive bubbles), then proceed to plating. All operations should be conducted on a metal ice bucket or ice. Once proficient, the entire process of loading gel, mixing, and plating should be completed within half a minute to maintain the good fluidity of the matrix gel.
5. Adding Medium
Place the prepared culture plate in a 37℃ incubator for 40-60 minutes to gel, and add 500-750μL of Organoid Culture Medium A for cultivation. After approximately 10-14 days, most organoids will have a diameter of 200um-500um and can be passaged.
6. Brain Organoid Identification Image

|
Item NO. |
Product Name |
Size |
|
1kit |
||
|
1kit |
||
|
Mouse Lung Organoid Culture Medium Kit |
1kit |
|
|
Human Breast Cancer Organoid Culture Medium Kit |
1kit |
|
|
Human Endometrial carcinoma Organoid Culture Medium Kit |
1kit |
|
|
Human Colorectal cancer Organoid Culture Medium Kit |
1kit |
|
|
Human Lung Cancer Organoid Culture Medium Kit |
1kit |
|
|
1kit |
||
|
Human Pancreatic Cancer Organoid Culture Medium Kit |
1kit |
|
|
Human Ovarian Cancer Organoid Culture Medium Kit |
1kit |
|
|
Human Liver Organoid Culture Medium Kit |
1kit |
|
|
1kit |
||
|
Mouse Gastric Cancer Organoid Culture Medium Kit |
1kit |
|
|
1kit |
||
|
Mouse Breast Cancer Organoid Culture Medium Kit |
1kit |
|
|
Mouse Hepatocarcinoma Organoid Culture Medium Kit |
1kit |
|
|
1kit |


