| Usage |
1. Required equipment and reagents:
1. Microplate reader (wavelength 450nm filter)
2. 37 °C incubator (CO for cells is not recommended2Incubator)
3. Automatic plate washer or multi-channel pipette/5mL dropper (for manual plate washing)
4. Precise single-channel (0.5-10uL, 5-50uL, 20-200uL, 200-1000uL) and multi-channel pipettes (the pipette needs to be calibrated before use)
5. Sterile EP tube and disposable tip
6. Absorbent paper and sample loading tank
7. Deionized water or distilled water
2. Sample collection and preservation:
The following sample processing steps are streamlined.
1. Serum
Whole blood samples were left at room temperature for 2 hours or overnight at 2-8 °C. Centrifuge at 1000 × g for 20 minutes, and take the supernatant. Can be tested immediately or frozen at 20 °C or-80 °C in single-use packages.
2. Plasma
It is recommended to use EDTA-Na2/K2 as an anticoagulant. Centrifuge at 2-8 °C and 1000 × g for 15 minutes within 30 minutes after sample collection, and take the supernatant. Can be tested immediately or frozen at-20 °C or-80 °C in single-use packages. Please refer to the sample preparation guidelines for the use and selection of other anticoagulants.
3. Tissue samples
Tissue samples are generally made into tissue homogenates, and the processing methods are as follows:
(1) Place the target tissue on ice, wash it with pre-cooled PBS buffer (0.01 M, pH = 7.4) to remove the residual blood, weigh it and use it later.
(2) Grind the tissue homogenate with lysate on ice. The volume of lysate added depends on the weight of the tissue, and typically 9 mL of lysate is used per 1 g of tissue fragment. In addition, it is recommended to add a protease inhibitor, such as 1 mM PMSF, to the lysate.
(3) Ultrasonic crushing or repeated freeze-thaw can be used for further treatment (during the ultrasonic crushing process, ice bath cooling is required; the repeated freeze-thaw method can be repeated twice).
(4) Centrifuge the prepared homogenate at 5000 × g for 5min, and retain the supernatant for detection. Or frozen at-20 °C or-80 °C in single-use packages.
(5) According to the needs of the experiment, the total protein concentration of tissue homogenate samples can be measured first to facilitate data analysis. BCA method is recommended. Generally, the total protein concentration is adjusted to 1-3 mg/mL for ELISA detection. Some tissue samples, such as liver, kidney and pancreas, contain high concentrations of endogenous peroxygenase, which will react with chromogenic substrates at high sample concentrations, resulting in false positives. 1% H may be attempted2O2Inactivate for 15 minutes and then detect.
Note: PBS buffer is usually used for lysates, or medium strength RIPA lysates are used. When using RIPA lysate, the PH value needs to be adjusted to PH 7.3. Avoid using components containing NP-40, Triton X-100 and DTT, which will seriously inhibit the operation of the kit. It is recommended to use 50mM Tris + 0.9% NaCL + 0.1% SDS, PH 7.3, which can be prepared by yourself.
4. Cell culture supernatant
The supernatant was collected, centrifuged at 2-8 ° C. at 2500 rpm for 5 min, and the clear cell culture supernatant was collected. Use immediately for testing, or freeze at-80 °C as a single-use quantity.
5. Cell lysate
(1) Collection and lysis of suspended cells: centrifuge at 2-8 °C and 2500 rpm for 5 minutes to collect the cells. Add pre-cooled PBS, gently mix and wash, centrifuge at 2-8 °C at 2500 rpm for 5 minutes, and collect the cells. Add 0.5-1mL of cell lysate and appropriate amount of protease inhibitor (such as PMSF, working concentration 1mmol/L), put on ice, lyse for 30min-1h, or disrupt with ultrasonic waves.
(2) Collection and lysis of adherent cells: aspirate the supernatant and add pre-cooled PBS to wash three times. Add 0.5-1mL of cell lysate and an appropriate amount of protease inhibitor (such as PMSF, working concentration 1mmol/L), and gently scrape off the adherent cells with a cell scraper. The cell suspension was transferred into a centrifuge tube, placed on ice, lysed for 30 min-1 h, or disrupted by ultrasonic waves.
(3) During the cell lysis process, the centrifuge tube can be blown with the gun tip or shaken intermittently to fully lyse the protein, and the sticky appearance is DNA. Ultrasonic waves can be used to break the DNA. (Or use an ultrasonic 3-5mm probe, power 150-300W, ultrasonically treat the sample on ice, work for 1-2 seconds, stop for 30 seconds, 3-5 cycles.)
(4) After lysis or ultrasonic disruption is completed, centrifuge at 2-8 °C at 10000rpm for 10min, and transfer the supernatant into an EP tube for detection immediately, or pack it at-80 °C for frozen storage according to the amount used once.
Note: The precautions are the same as for tissue samples.
6. Other biological samples
Centrifuge the sample at 1000 × g for 20 min at 2-8 °C. The supernatant is collected for testing immediately, or frozen at-80 °C as a single-use amount.
3. Other precautions for samples
1. The test tube for collecting blood should be a disposable endotoxin-free test tube. Avoid the use of hemolyzed, hyperlipidemic samples.
2. Optimal storage conditions for samples: 2-8 °C should be stored for less than 5 days,-20 °C should not exceed 6 months,-80 °C should not exceed 2 years, and should be stored in liquid nitrogen beyond the above time. When the frozen specimen is thawed, in order to reduce the damage of ice crystals (0 °C) to the sample, it should be quickly thawed in a 15-25 °C water bath, centrifuged to remove the sediment after thawing, and mixed evenly for testing.
3. The detection range of the kit is not equal to the concentration range of the substance to be tested in the sample. If the concentration of the test substance in the sample is too high or too low, please dilute or concentrate the sample appropriately.
4. If the sample tested is special and there is no reference data, it is recommended to conduct pre-experiments to verify its effectiveness.
5. The recombinant protein may not match the capture or detection antibody in the kit and cannot be detected.
4. Recommended sample dilution plan
The matrix components in serum/plasma will affect the test results and need to be diluted at least 2 times (1/2) with sample diluent!
If your model group samples require other dilution ratios, please refer to the following general dilution scheme (this scheme is a dilution scheme without double wells for testing. When double wells need to be set, please mix the sample and dilution volume x the number of double wells):
Dilute 2-fold (1/2): One-step dilution. Add 60uL of sample to 60uL of sample diluent and mix gently.
Dilution 5 times (1/5): One step dilution. Add 24uL of sample to 96uL of sample dilution and mix gently.
Dilution 10-fold (1/10): One step dilution. Add 12uL of sample to 108uL of sample diluent and mix gently.
Dilution 20-fold (1/20): One step dilution. Add 6uL of sample to 114uL of sample dilution and mix gently.
Dilution 50-fold (1/50): One step dilution. Add 3uL of sample and 47uL of normal saline (i.e. 0.9% sodium chloride) to 100uL of sample diluent and mix gently.
Dilution 100-fold (1/100): One-step dilution. Add 3uL of sample and 177uL of normal saline to 120uL of sample diluent and mix gently.
Dilution 1000 times (1/1000): Two-step dilution, you can dilute 50 times first (this step is all diluted with normal saline), and then dilute 20 times. Gently mix well.
Dilution 10000 times (1/10000): Two-step dilution, you can dilute 100 times first (this step is all diluted with normal saline), and then dilute 100 times. Gently mix well.
Dilution 100000 times (1/100000): Three-step dilution, you can first dilute 50 times, then dilute 20 times (the first two steps are all diluted with normal saline), and finally dilute 100 times.
Gently mix well.
Note: The amount of liquid taken during each dilution step shall not be less than 3uL, and the dilution factor shall not exceed 100 times. Each step of dilution should be mixed evenly to avoid foaming.
5. Reagent preparation before testing
Remove the kit from the refrigerator 20min in advance and equilibrate to room temperature (18-25 °C). If the kit needs to be used multiple times, please take out only the enzyme-labeled slats and standards required for this experiment, and store the remaining enzyme-labeled slats and standards according to the specified conditions.
1. Lotion:
Dilute 30mL of concentrated wash solution (15mL for 48T) to 750mL (375mL for 48T) with deionized water or distilled water (ultrapure water with a resistivity of 18MΩ recommended) and mix well. Or according to the requirements of the experiment, take an appropriate amount of concentrated washing solution to dilute to 25 times the volume and mix well, and return the unused solution to 2-8 °C. If crystals are formed in the concentrated wash solution, they can be heated in a 40 °C water bath (the heating temperature should not exceed 50 °C) until the crystals are completely dissolved, mixed well and used. It is best to use the prepared lotion on the same day. If it can't be used up, it can be stored at 2-8 °C for no more than 48 hours.
2. Standard:
(1) Centrifuge the freeze-dried standard tube at 10000 × g for 1min. Marked as Zero tube.
(2) Add 1mL of sample diluent to the freeze-dried standard product tube, tighten the cap of the tube, let it stand at room temperature for 2min, and gently mix it upside down several times (or add 1mL of sample diluent, let it stand for 1-2min, and mix it with a low-speed vortex instrument for 3-5 seconds). Centrifuge at 1000 × g at low speed for 1 min, and collect the liquid to the bottom of the tube.
(3) Gradient dilution: another seven EP tubes were taken and labeled 1/2, 1/4, 1/8, 1/16, 1/32, 1/64 and blank. Add 0.3 mL of sample dilution to each EP tube first. Add another 0.3 mL of Zero tube standard solution to 1/2 tube and mix well. Take 0.3 mL of 1/2 tube standard solution into 1/4 tube and mix thoroughly. Take 0.3 mL of 1/4 tube standard solution into 1/8 tube, mix thoroughly, and so on. Note that there is only sample dilution in the Blank EP tube. At this time, the concentrations of standards in the eight EP tubes from the Zero tube tube to the blank tube were 1000 pg/mL, 500 pg/mL, 250 pg/mL, 125 pg/mL, 62.5 pg/mL, 31.25 pg/mL, 15.625 pg/mL, and 0 pg/mL, respectively.
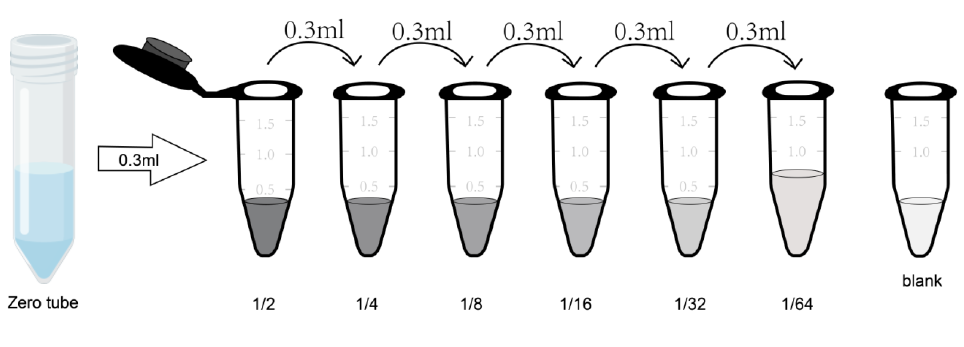
Note: Dissolved tube zero standard, store at 2-8 °C and use within 12 hours. Please use other diluted gradient standard working solutions within 2 hours。
3. Biotin-antibody working solution:
It should be prepared within 30 minutes before the experiment, and it should be prepared for use now. It is not suitable for long-term storage.
(1) Calculate the total volume of required working fluid: 100uL/hole × number of holes. (It is best to prepare an amount of 100uL-200uL more than the total volume)
(2) Centrifuge at 1000 × g at low speed for 1 min, and collect the concentrated biotin-antibody to the bottom of the tube.
(3) Dilute the concentrated biotin-antibody with the antibody diluent at the ratio of 1/100, and mix well. (e.g. add 10uL of concentrated biotin-antibody to 990uL of antibody dilution)
4. HRP-streptavidin (SABC) working solution:
Prepare it within 30 minutes before the experiment, and use it now. It is not suitable for long-term storage.
(1) Calculate the total volume of required working fluid: 100uL/hole × number of holes. (It is best to prepare an amount of 100uL-200uL more than the total volume.)
(2) Centrifuge at 1000 × g low speed for 1 min, and collect the concentrated SABC to the bottom of the tube.
(3) Dilute and concentrate SABC with SABC diluent at the ratio of 1/100, and mix well. (e.g. 10uL of concentrated SABC is added to 990uL of SABC dilution)
6. Summary of operation steps
Step 1:Add 100 uL of standard or sample to be tested to the well, coat it with film, and incubate at 37 ° C. for 90 minutes.
Plate washing:Wash the plate 2 times. No soaking.
Step 2:100 uL of biotin-antibody working solution was added, coated, and incubated at 37 ° C. for 60 minutes.
Plate washing:Wash the plate 3 times. Soak for 1min each time.
Step 3:100 uL of HRP-streptavidin (SABC) working solution was added, coated with a film, and incubated at 37 ° C. for 30 minutes.
Plate washing:Wash the plate 5 times. Soak for 1min each time.
Step 4:90 uL of TMB chromogenic substrate was added. Apply the coating film and incubate at 37 °C for 10-20min (please use TMB color development precision control method).
Step 5:50 uL of the reaction stop solution was added. The OD450 value was immediately read at 450 nm and calculated.
7. Detailed operation steps
When diluting samples and reagents, they should be thoroughly mixed. It is recommended that a standard curve be plotted for each test.
1. Set standard wells, sample wells and blank wells, and record their positions. In order to reduce experimental errors, it is recommended to set up double holes for standards and samples.
2. Sample addition: Add 100uL of each gradient standard to the standard well, add 100uL of moderately diluted sample to be tested to the sample well, and add 100uL of sample diluent to the blank well. The coating was applied and incubated at 37 ° C. for 90 min. (Add the solution to the bottom of the microplate, gently shake and mix well, avoiding contact with the tube wall and blistering as much as possible.)
3. Wash the plate twice: Remove the coating film, suck or shake off the liquid in the enzyme labeled plate, and pat it on clean absorbent paper 2-3 times. Add 350uL of washing buffer to each well, do not soak, discard the liquid in the well, and pat it on absorbent paper for 2-3 times. Repeat this plate washing step 2 times.
4. Add biotin-antibody working solution: Add 100uL of biotin-antibody working solution to each well. The film was applied and incubated at 37 ° C. for 60 minutes.
5. Wash the plate 3 times: Remove the coating film, suck or shake off the liquid in the enzyme labeled plate, and pat it on clean absorbent paper 2-3 times. Add 350uL of washing buffer to each well, soak for 1min, discard the liquid in the well, and pat 2-3 times on absorbent paper. Repeat the plate washing step 3 times.
6. Add HRP-streptavidin (SABC): Add 100uL of SABC working solution to each well. Apply the film and incubate at 37 ° C. for 30 minutes. (While equilibrating the whole bottle of TMB in 37 °C incubator)
7. Wash the plate 5 times: Remove the coating film and wash the plate 5 times with washing buffer. Refer to step 5 for the method.
8. Add TMB chromogenic substrate: Add 90uL of TMB chromogenic substrate to each well, apply a coating film, and incubate at 37 °C in the dark for 10-20min. Turn on the microplate reader and preheat for 15 minutes. (Note: Do not use the loading tank for preparing HRP conjugate. Color development According to the actual change of color, the reaction time can be shortened or extended, but cannot exceed 30min. When a good blue gradient appears in the standard well, the reaction can be terminated.
9. Add reaction stop solution: After color development, the liquid in the hole cannot be discarded. Add 50uL of reaction stop solution to each hole. The color will instantly change from blue to yellow. The stop solution was added in the same order as the TMB substrate was added.
10. Measurement of OD value: Immediately read the OD450 value at 450nm with a microplate reader. (If your plate reader has a selectable calibration wavelength, set it to 570nm or 630nm. The calibration read is the value of OD450 minus the value of OD570 or OD630. This method corrects and removes the OD value of non-chromogenic substances, thus obtaining a more accurate test result. If the plate reader does not have a wavelength of 570nm or 630nm, the original OD450 value can be used.)
8. Result calculation
1. Take the average OD450 value of the standard and sample duplicate wells (using the original OD450 value or the corrected reading value), and then subtract the OD450 value of the blank well as the calculated value.
2. With the concentration as the abscissa and the OD450 value as the ordinate, you can use the four-parameter equation 4PL to draw the standard curve (the value of the blank hole is removed when drawing). You can also use the mapping software that comes with the microplate reader (such as Thermo FC model microplate reader SkanIt RE software), or Curve Expert 1.3 or 1.4 professional software (the company's website can be downloaded and used for free) to draw the standard curve.
3. Substitute the OD450 value of the sample into the standard curve to calculate the concentration value of the sample. If the sample has been diluted, multiply it by the corresponding dilution factor.
9. Instructions for drawing standard curves by different methods
1. Linear graph: one coordinate axis represents the concentration of antigen, and the other represents the read OD450 value. The R2 value is generally used herein to determine the fit, and a value greater than 0.99 indicates a very good fit. However, linear plots tend to compress the data points on the lower end of the curve, resulting in inaccurate calculation results.
2. Semi-logarithmic graph: helps to offset the lower end compression caused by linear graph. Semi-logarithmic plots use the logarithm of concentration versus readings. This approach typically results in sigmoidal curves with a more uniform distribution of data points.
3. Logarithmic/double logarithmic plot: Provides good linearity for low to medium concentration range. But the high end of the range tends to lose linearity.
4. Four-or five-parameter equation (4PL or 5PL) curve: The method is more complicated and considers other parameters, such as maximum and minimum values, so more complicated calculations are required. Whereas 4PL assumes symmetry around the inflection point, 5PL considers asymmetric cases and is generally more suitable for immunoassays. If your software allows, 4-PL and 5-PL will work for most ELISA calibration standard curves.
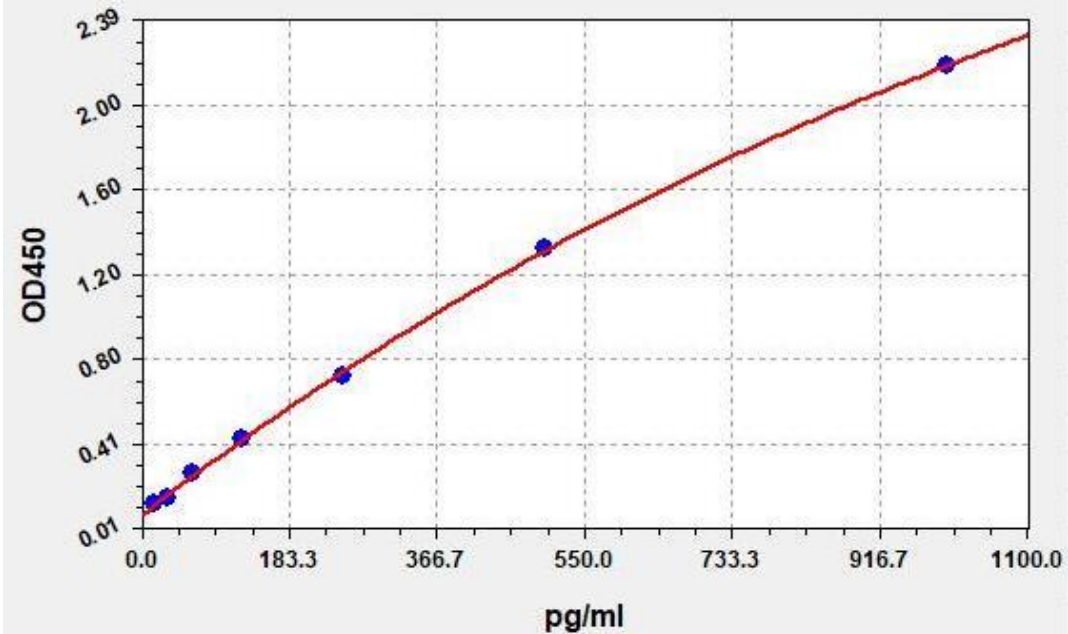
10. Experimental data and standard curve
This product has been tested by the quality control department and meets the performance requirements of the instruction manual. (The humidity in the laboratory is 20%-60%, and the temperature is 18 °C-25 °C. Equilibrate TMB to 37 °C before color development, and incubate at 37 °C for 15 minutes in the dark after adding the labeled plate well.)
Due to differences in specific experimental environment and operation, the following experimental data and standard curves are for reference only, and experimenters need to establish standard curves according to their own experiments.
| STD. (pg/mL) |
OD-1 |
OD-2 |
Average |
Corrected |
| 0 |
0.077 |
0.081 |
0.079 |
0 |
| 15.625 |
0.125 |
0.131 |
0.128 |
0.049 |
| 31.25 |
0.153 |
0.159 |
0.156 |
0.007 |
| 62.5 |
0.265 |
0.275 |
0.27 |
0.191 |
| 125 |
0.427 |
0.445 |
0.436 |
0.357 |
| 250 |
0.716 |
0.746 |
0.731 |
0.652 |
| 500 |
1.302 |
1.356 |
1.329 |
1.25 |
| 1000 |
2.14 |
2.228 |
2.184 |
2.105 |
Precision
In-plate precision: Low, medium and high concentration samples were detected 20 times on the same enzyme labeled plate.
Inter-plate precision: Low, medium and high concentration samples were detected 20 times on 3 enzyme labeled plates respectively.
| Category |
Intraplate coefficient of variation |
Interplate coefficient of variation |
| Sample |
1 |
2 |
3 |
1 |
2 |
3 |
| Quantity |
20 |
20 |
20 |
20 |
20 |
20 |
| Mean (pg/mL) |
30.66 |
121.9 |
522 |
32.12 |
121.5 |
515 |
| Standard deviation |
1.64 |
7.51 |
27.61 |
1.65 |
6.73 |
25.9 |
| Coefficient of Variation (%) |
5.36 |
6.16 |
5.29 |
5.14 |
5.54 |
5.03 |
Recovery
An amount of IFN-α was added to the sample and the recovery was calculated by comparing the measured value to the expected amount of IFN-α in the sample.
< td style = "width: 24.6081%; text-align: center; "> Sample Type| Recovery Range (%) |
Average recovery (%) |
| Serum (n = 10) |
85-104 |
95 |
| DETA plasma (n = 10) |
86-102 |
93 |
| Heparin plasma (n = 10) |
87-103 |
91 |
linear
The samples added with the appropriate concentration of IFN-α were diluted 2-fold, 4-fold, and 8-fold respectively to detect the recovery range.
| Sample Type |
1:2 |
1:4 |
1:8 |
| Serum (n = 10) |
85-99% |
83-96% |
93-102% |
| DETA plasma (n = 10) |
84-100% |
83-97% |
88-99% |
| Heparin plasma (n = 10) |
82-89% |
81-99% |
86-101% |
|