Rat CASP-1 ELISA Kit
Rat CASP-1 ELISA Kit
Product Details
Product Details
Product Specification
| protein | CASP-1 | |||||||||||||||||||||||||||||||||||||||||||||||||||||||||||
| Usage |
Sample collection preparation and preservation 1. Serum: Whole blood sample placed at room temperature 2 Hour or 4°C Overnight after 1000×g Centrifugation 20 Minutes, take the supernatant to detect. 2. Plasma: Sample after collection 30 Within minutes 2-8°C 、 1000×g Centrifugation 15 Minutes, take the supernatant to detect. 3. Tissue homogenate: Take an appropriate amount of tissue block and add it to the pre-cooled PBS ( 0.01M , pH7.0-7.2 ) to remove blood (lysed red blood cells in the homogenate will affect the measurement result), cut the tissue into pieces after weighing, and then mix it with the corresponding volume of PBS (Generally according to 1:9 The mass-to-volume ratio, the specific volume can be appropriately adjusted according to the needs of the experiment, and recorded. 4. Cell culture supernatant: Take the cell supernatant from 1000×g Centrifugation 20 Minutes, impurities and cell debris were removed. 5. Urine: Please collect the first urine in the morning (mid-section urine), or 24 Hourly urine, 2000×g Centrifugation 15 The supernatant was collected after minutes and the sample was saved At -20°C And repeated freezing and thawing should be avoided. 6. Saliva: A sample is collected with a saliva sample collection tube, and then 2-8°C, 1000×g Centrifugation 15 Minutes, take the supernatant to detect, or sub-package -20°C Save. 7. Other biological samples: Please 1000×g Centrifugation 20 Minutes, take the supernatant to detect. Notes 1. The sample should be clear and transparent, and the suspended solids should be removed by centrifugation. 2. After sample collection, if 1 Testing within weeks can be stored at 4°C , if it cannot be detected in time, please pack it according to the one-time usage amount and freeze it in -20°C ( 1 Within months), or -80°C ( 3-6 Test within a month) to avoid repeated freezing and thawing. Principles of sample dilution If your test sample needs to be diluted, refer to the general dilution principles below: 1. Dilution 50 Times: One-step dilution. 2. Dilution 100 Times: One-step dilution. 3. Dilution 1000 Times: Two-step dilution. 4. Dilution 100000 Times: Three-step dilution. 5. The amount of liquid taken during each dilution step is not less than 3 μL , the dilution factor is not more than 100 Times. 6. When the dilution factor is very high, you can use it first PBS Dilution, last step using standard in kit & Sample dilution. Sample dilution recommendations 1. Normal fresh serum / Plasma Sample Recommendation (Original solution) Testing. 2. Due to individual variations, the recommended dilution factor is for informational purposes only. Preparation for testing 1. Please advance 30 Minutes remove the kit from the refrigerator and equilibrate to room temperature. 2. Use double distilled water 25× The concentrated wash liquid is diluted to 1× Working fluid, put back unused 4°C 。 3. Standard: Add standard & Sample Universal Diluent 1.0 mL Into the lyophilized standard, screw the tube cap tightly and let stand 10 Minutes, and after it is fully dissolved, gently mix (concentration of 20 ng/mL )。 4. Biotinylated antibody working solution: calculate the dosage required for the current experiment before the experiment (according to 100 μL/ Hole meter, should be configured more in actual configuration 100-200 μL ), before use 15 Min, concentrated biotinylated antibody was diluted with biotinylated antibody diluent ( 1:100 ) into working concentration, use on the same day. 5. Enzyme conjugate working solution: calculate the dosage required for the current experiment before the experiment (according to 100 μL/ Hole meter, should be configured more in actual configuration 100-200 μL )。 6.TMB Substrate —— Pipette the desired dose of solution and do not pour the residual solution back into the reagent vial again. Preparation before the experiment 1. All materials and prepared reagents were equilibrated to room temperature prior to use. 2. The user should calculate the number of samples that may be used throughout the trial. 3. Please estimate the concentration before measurement. Operation steps 1. Before the start of the experiment, each reagent should be balanced to room temperature, and all reagents should be configured in advance. 2. Add standard or sample to be tested 100 μL (If the sample needs to be diluted, please refer to the sample dilution principle for the dilution method). 3. Discard the liquid in the hole, spin dry, wash the plate 3 Times. 4. Add biotin antibody working solution per well 100μL (can be advanced 15 Preparation in minutes), the enzyme labeled plate is coated, 37°C incubation 50 Minutes. 5. Discard the liquid in the well and wash the plate 3 Times. 6. Add enzyme conjugate working solution per well 100 μL (can be advanced 15 Minute preparation), 37°C incubation 50 Minutes. 7. Discard the liquid in the well and wash the plate 5 Times. 8. Add per well TMB Chromogenic substrate solution 90 μL , 37°C Incubate in the dark 20 Minutes (shortened or extended as appropriate according to the actual color development, but not exceeding 30 Minutes). 9. Add stop solution to each well 50 μL , terminate the reaction (blue immediately turns yellow at this time). 10. Immediately use a microplate reader in 450 nm The optical density values of each well were measured at the wavelength ( OD Value). Results Calculation 1. Of each standard and sample OD Value should be subtracted from the blank hole OD Value. 2. For ease of calculation, although the concentration is an independent variable and OD The value is the dependent variable, and we still use the standard when drawing OD Values as abscissa ( X Axis), the concentration of the standard is the ordinate ( Y Axis).
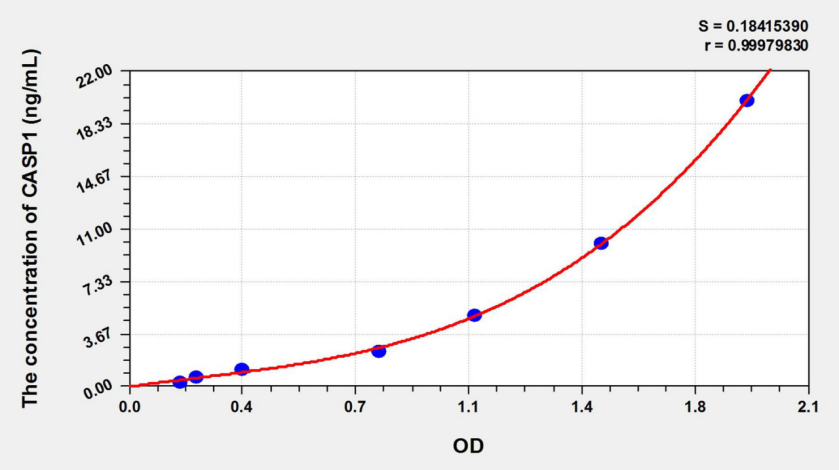 Note : This picture is for reference only Precision Intraplate precision ( Precision within the assay ):CV%<8% Three samples with known concentrations were respectively in 1 Test on enzyme label plates 20 Times to evaluate the precision in the assay plate. Inter-plate precision ( Measure inter-plate precision ):CV%<10% Three samples with known concentrations were respectively in 3 Tested on different enzyme plates 40 Times to evaluate the precision of the analytical plate.
Recovery Add known concentrations of rats to different samples CASP1 , do the recovery experiment, get the recovery range and average recovery rate
linear Rats will be added CASP1 The samples were diluted separately 2 Times, 4 Times, 8 Times, 16 Double the recovery experiment to obtain the recovery rate range
|
|||||||||||||||||||||||||||||||||||||||||||||||||||||||||||
| Sensitivity | 0.108 ng/mL | |||||||||||||||||||||||||||||||||||||||||||||||||||||||||||
| Theory | This kit adopts the principle of sandwich method. The specific anti-rat CASP1 antibody was coated in a 96-well microplate, and the rat CASP1 standard or sample was added to the microwells respectively, and the rat CASP1 protein in the standard or the rat CASP1 protein in the sample was bound to the anti-rat CASP1 antibody solid on the microplate, then the biotinylated anti-rat CASP1 antibody was added, the unbound biotinylated antibody was washed, HRP-labeled streptavidin was added, and then TMB substrate was added to develop color. TMB is converted to blue under peroxidase catalysis and to final yellow under the action of acid. There was a positive correlation between the depth of color and rat CASP1 protein in the sample. The absorbance (OD value) was measured with a microplate reader at a wavelength of 450 nm, and the sample concentration was calculated by drawing a standard curve. | |||||||||||||||||||||||||||||||||||||||||||||||||||||||||||
| Source | Rat | |||||||||||||||||||||||||||||||||||||||||||||||||||||||||||
| Synonym | Rat CASP1(Caspase 1) ELISA Kit;Rat Caspase-1 ELISA Kit | |||||||||||||||||||||||||||||||||||||||||||||||||||||||||||
| Detection Type | Rat CASP1 can be detected in samples and does not cross-react with other related proteins | |||||||||||||||||||||||||||||||||||||||||||||||||||||||||||
| Composition |
|
|||||||||||||||||||||||||||||||||||||||||||||||||||||||||||
| General Notes |
1. Please make sure that all components are dissolved and mixed before using the kit. If the reconstituted standard is not used, please discard it. 2. Concentrate the biotinylated antibody. The volume of the concentrated enzyme conjugate is small and may be dispersed in various parts of the tube during transportation. Please centrifuge at 1000 × g for 1 minute before use, so that the liquid on the tube wall or bottle cap can be deposited to the bottom of the tube. Mix the solution by carefully pipetting 4-5 times with a pipette before taking. Standard, biotinylated antibody working solution and enzyme conjugate working solution should be prepared according to the required dosage, and the corresponding diluent should be used to prepare without confusion. 3. The concentrated washing liquid taken out of the refrigerator may have crystals, which is a normal phenomenon. The crystals can be completely dissolved in a water bath or incubator before preparing the washing liquid (the heating temperature should not exceed 40 °C). The wash liquid should be at room temperature when used. 4. Sample addition needs to be quick, and it is best to control each sample addition within 10 minutes. In order to ensure the accuracy of the experiment, it is recommended to use double holes. Maintaining a consistent sequence of addition from well to well when pipetting reagents will ensure the same incubation time for all wells. 5. During the washing process, the washing liquid remaining in the reaction hole should be patted dry on absorbent paper. Do not put the filter paper directly into the reaction hole to absorb water. Before reading, pay attention to removing the residual liquid and fingerprints at the bottom, so as not to affect the reading of the microplate reader. 6. The developer TMB should avoid direct exposure to strong light during storage and use. After adding the substrate, pay attention to the color change in the reaction well. If the gradient is obvious, please terminate the reaction in advance to avoid too dark color affecting the reading of the microplate reader. 7. The test tubes and reagents used during the experiment are disposable, and it is strictly forbidden to reuse them, otherwise the experimental results will be affected. 8. Please wear a laboratory coat and latex gloves for protection during the experiment, especially when testing blood or other body fluid samples, please follow the national biological laboratory safety protection regulations. 9. Kit components of different batch numbers cannot be mixed (except washing solution and reaction stop solution). 10. The enzyme labeling strip in the kit is a detachable plate, please use it in batches according to the experimental requirements. |
|||||||||||||||||||||||||||||||||||||||||||||||||||||||||||
| Storage Temp. | Unopened kit, stored at 4 °C, shelf life 6 months. | |||||||||||||||||||||||||||||||||||||||||||||||||||||||||||
| Test Range | 0.32-20 ng/mL |