|
1. Sample collection preparation and preservation:
1 Serum: whole blood sample placed at room temperature 2 Hour or 4°C Overnight after 1000×g Centrifugation 20 Minutes, take the supernatant to detect. The blood collection tubes shall be disposable non-pyrogenic, non-endotoxin tubes. deposit -20°C Or -80°C Storage, avoid repeated freezing and thawing
2 Plasma: the sample after collection 30 Within minutes 2-8°C 、 1000×g Centrifugation 15 Minutes, take the supernatant to detect. Anticoagulants recommended EDTA-Na2 , avoid using hemolytic, hyperlipidemic samples. deposit -20°C Or -80°C Storage, avoid repeated freezing and thawing.
3 , tissue homogenate: take an appropriate amount of tissue block and put it on the pre-cooled PBS ( 0.01M , pH7.0-7.2 ) to remove blood (lysed red blood cells in the homogenate will affect the measurement result), cut the tissue into pieces after weighing, and then mix it with the corresponding volume of PBS (generally according to 1:9 The mass-to-volume ratio, the specific volume can be appropriately adjusted according to the needs of the experiment, and recorded. It is recommended to PBS Adding a protease inhibitor) into a glass homogenizer and fully grinding on ice; In order to further lyse tissue cells, the homogenate can be subjected to ultrasonic disruption or repeated freeze-thaw treatment (pay attention to ice bath cooling during ultrasonic disruption, and the repeated freeze-thaw method can be repeated 2 Times). Finally, the prepared homogenate is mixed in 5000×g Centrifugation 5-10 Minutes, take the supernatant to detect. (Tissue homogenates require simultaneous detection of protein concentrations to obtain a more accurate test substance concentration per milligram of protein.)
4 Cell culture supernatant: the cell supernatant was taken from 1000×g Centrifugation 20 Minutes, impurities and cell debris were removed. Take the supernatant to detect and place it in -20°C Or -80°C Store, but repeated freezing and thawing should be avoided.
5 , urine: Please collect the first urine in the morning (middle urine), or 24 Hourly urine, 2000×g Centrifugation 15 The supernatant was collected after minutes and the sample was saved At -20°C And repeated freezing and thawing should be avoided.
6 Saliva: collecting a sample with a saliva sample collection tube, and then at 2-8°C, 1000×g Centrifugation 15 Minutes, take the supernatant to detect, or sub-package -20°C Save. Avoid repeated freezing and thawing.
7 Other biological samples: please 1000×g Centrifugation 20 Minutes, take the supernatant to detect.
Note:
( 1 ) The sample should be clear and transparent, and the suspended solids should be removed by centrifugation. Hemolysis of the sample will affect the results, so hemolyzed samples should not be used.
( 2 ) After sample collection, if 1 Testing within weeks can be stored at 4°C , if it cannot be detected in time, please pack it according to the one-time usage amount and freeze it in -20°C ( 1 Within months), or -80°C ( 3-6 Test within a month) to avoid repeated freezing and thawing. Keep the sample at room temperature prior to the experiment.
2. Sample dilution principle:
If your test sample needs to be diluted, refer to the general dilution principles below:
1. Dilution 50 Times: One-step dilution. Take 5 μL Sample to 245 μL Standard & In the sample dilution, is 50 Double dilution;
2. Dilution 100 Times: One-step dilution. Take 5 μL Sample to 495 μL Standard & In the sample dilution, is 100 Double dilution;
3. Dilution 1000 Times: Two-step dilution. Take 5 μL Sample to 95 μL Standard & In the sample dilution, is 20 Dilute, and then take 5 μL 20 Double dilute sample to 245 μL Standard & In the sample dilution, is 50 Double dilution, co-dilution 1000 Times;
4. Dilution 100000 Times: Three-step dilution. Take 5 μL Sample to 195 μL Standard & In the sample dilution, is 40 Dilute, and then take 5 μL 40 Double dilute sample to 245 μL Standard & In the sample diluent, do 50 Time dilution, and finally take 5 μL 2000 Double dilute sample to 245 μL Standard & In the sample diluent, do 50 Double dilution, total dilution 100000 Times;
5. The amount of liquid taken during each dilution step is not less than 3 μL , the dilution factor is not more than 100 Times. Too small sampling volume can easily cause greater errors in the mixing process, and each step of dilution needs to be mixed evenly to avoid foaming.
6. When the dilution factor is very high, you can use it first PBS Dilution, last step using standard in kit & Sample dilution.
3. Sample dilution suggestions
1. Normal fresh serum / Plasma Sample Recommendation (Original solution) Testing.
2. Due to individual variations, the recommended dilution factor is for informational purposes only. For actual testing, please estimate the concentration range of the sample in advance, and determine the dilution factor of the sample to be tested through pre-experiments.
4. Preparations before testing
1. Please advance 30 Minutes remove the kit from the refrigerator and equilibrate to room temperature.
2. Use double distilled water 25× The concentrated wash liquid is diluted to 1× Working fluid, put back unused 4°C 。
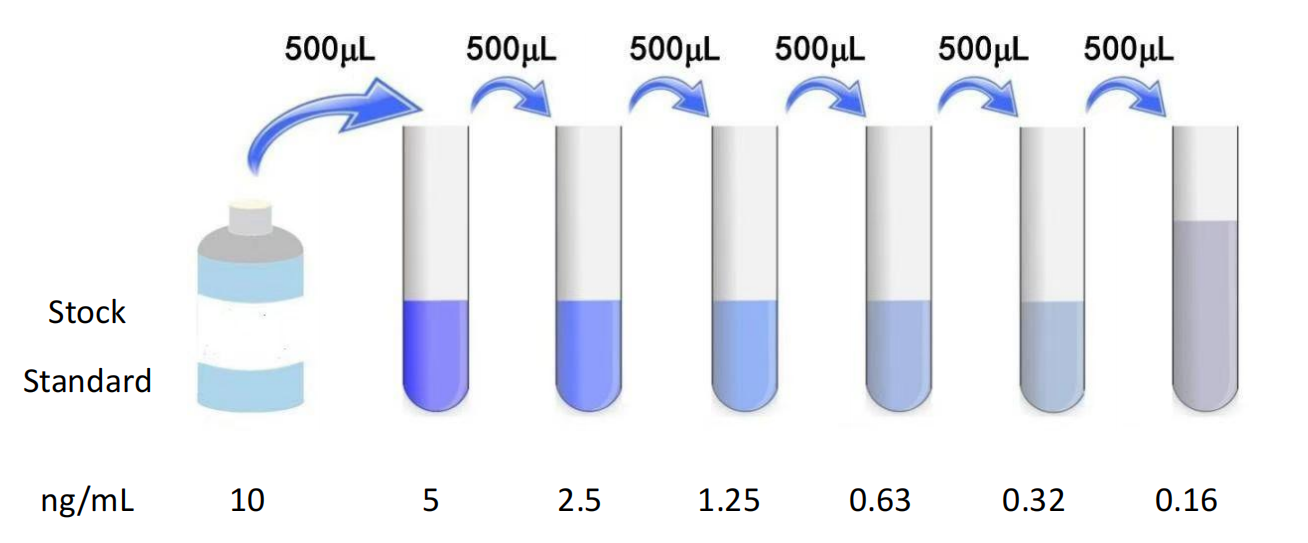
3. Standard: Add standard & Sample Universal Diluent 1.0 mL Into the lyophilized standard, screw the tube cap tightly and let stand 10 Minutes, and after it is fully dissolved, gently mix (concentration of 10 ng/mL )。 Thereafter, double dilution is carried out to 10 ng/mL , 5 ng/mL , 2.5 ng/mL , 1.25 ng/mL , 0.63 ng/mL , 0.32 ng/mL , 0.16 ng/mL Standard dilution ( 0 ng/mL ) is a blank hole. Configure the standard according to the amount you need for later use. The configured standards are recommended in 15 Add the sample within minutes, and it is not recommended to leave it for too long.
4. Biotinylated antibody working solution: calculate the dosage required for the current experiment before the experiment (according to 100 μL/ Hole meter, should be configured more in actual configuration 100-200 μL ), before use 15 Min, concentrated biotinylated antibody was diluted with biotinylated antibody diluent ( 1:100 ) into working concentration, use on the same day. Dilution principle 1 μL Concentrated biotinylated antibody is added to 99 μL In the biotinylated antibody dilution, mix well with a pipette.
5. Enzyme conjugate working solution: calculate the dosage required for the current experiment before the experiment (according to 100 μL/ Hole meter, should be configured more in actual configuration 100-200 μL )。 Before use 15 Minutes, dilute and concentrate with enzyme conjugate diluent HRP Enzyme conjugate ( 1:100 ) into working concentration, use on the same day. Dilution principle 1 μL The concentrated enzyme conjugate is added to 99 μL The enzyme conjugate dilution was mixed with a pipette.
6.TMB Substrate —— Pipette the desired dose of solution and do not pour the residual solution back into the reagent vial again.
5. Preparation before the experiment
1. All materials and prepared reagents were equilibrated to room temperature prior to use. Before use, mix all reagents thoroughly, taking care not to create any foam.
2. The user should calculate the number of samples that may be used throughout the trial. Please reserve enough samples in advance.
3. Please estimate the concentration before measurement. If these values are not within the standard curve range, the user must determine the optimal sample dilution for their particular experiment.
6. Operation steps
1. Before the start of the experiment, each reagent should be balanced to room temperature, and all reagents should be configured in advance. When reagents or samples are diluted, they should be mixed evenly, and foaming should be avoided as much as possible when mixing evenly. If the sample concentration is too high, dilute with a sample diluent to bring the sample within the range of the kit.
2. Add standard or sample to be tested 100 μL (If the sample needs to be diluted, please refer to the sample dilution principle for the dilution method). Be careful not to have bubbles. When adding the sample, add the sample to the bottom of the well of the enzyme label plate, try not to touch the well wall, gently shake and mix well, and add the enzyme label plate. Cover or coating, 37°C incubation 80 Minutes. To ensure the validity of the experimental results, please use a new standard solution for each experiment.
3. Discard the liquid in the hole, spin dry, wash the plate 3 Times. For each well 200 μL Washing with washing solution, soaking 1-2 Minutes, shake off the liquid in the labeled plate (or wash the plate with a plate washer). After the last wash was complete, the plate was pat dry on absorbent paper.
4. Add biotin antibody working solution per well 100μL (can be advanced 15 Preparation in minutes), the enzyme labeled plate is coated, 37°C incubation 50 Minutes.
5. Discard the liquid in the well and wash the plate 3 Times. For each well 200μL Washing with washing solution, soaking 1-2 Minutes, shake off the liquid in the labeled plate (or wash the plate with a plate washer). After the last wash was complete, the plate was pat dry on absorbent paper.
6. Add enzyme conjugate working solution per well 100 μL (can be advanced 15 Minute preparation), 37°C incubation 50 Minutes.
7. Discard the liquid in the well and wash the plate 5 Times. For each well 200 μL Washing with washing solution, soaking 1-2 Minutes, shake off the liquid in the labeled plate (or wash the plate with a plate washer). After the last wash was complete, the plate was pat dry on absorbent paper.
8. Add per well TMB Chromogenic substrate solution 90 μL , 37°C Incubate in the dark 20 Minutes (shortened or extended as appropriate according to the actual color development, but not exceeding 30 Minutes).
9. Add stop solution to each well 50 μL , terminate the reaction (blue immediately turns yellow at this time). The sequence of addition of the terminating solution should be the same as that of the developer as possible. In order to ensure the accuracy of the experimental results, the termination solution should be added as soon as possible after the substrate reaction time expires.
10. Immediately use a microplate reader in 450 nm The optical density values of each well were measured at the wavelength ( OD Value). The instrument should be preheated before use, and the testing program should be set up.
7. Result calculation
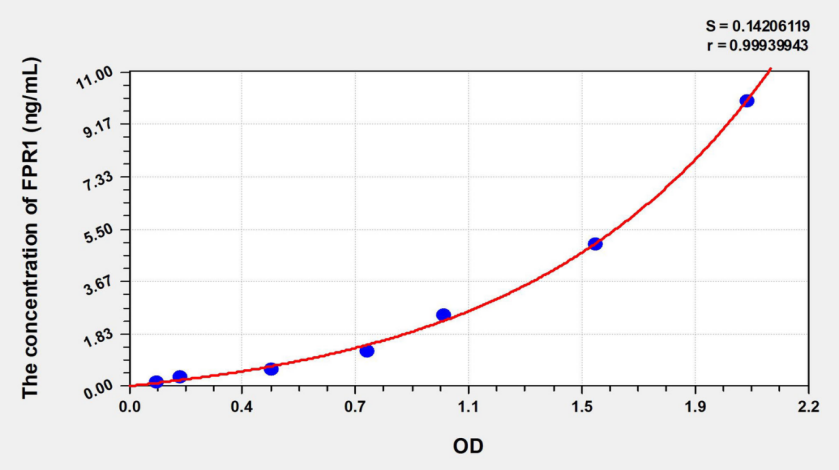
1. Of each standard and sample OD Value should be subtracted from the blank hole OD Value. If a double hole is set, the average value should be taken for calculation.
2. For ease of calculation, although the concentration is an independent variable and OD The value is the dependent variable, and we still use the standard when drawing OD Values as abscissa ( X Axis), the concentration of the standard is the ordinate ( Y Axis). At the same time, for the intuition of the test results, the figure provides raw data instead of logarithmic values. Due to the different experimental operating conditions ( such as operator, pipetting technology, plate washing technology and temperature conditions, etc.), the standard curve OD Values will vary. The standard curve provided is for reference only, and the experimenter needs to establish the standard curve according to his own experiment. Spent sample OD The value can be calculated on the standard curve to calculate the sample concentration and multiply it by the dilution factor, which is the actual concentration of the sample. It is recommended to use professional curve drawing software such as curve expert 。
Concentration (ng/mL) |
OD |
Corrected OD |
10 |
2.135 |
2.039 |
5 |
1.637 |
1.541 |
2.5 |
1.135 |
1.039 |
1.25 |
0.883 |
0.787 |
0.63 |
0.567 |
0.471 |
0.32 |
0.262 |
0.166 |
0.16 |
0.186 |
0.09 |
0 |
0.096 |
0.000 |
Note : This picture is for reference only
Precision
Intraplate precision ( Precision within the assay ):CV%<8%
Three samples with known concentrations were respectively in 1 Test on enzyme label plates 20 Times to evaluate the precision in the assay plate.
Inter-plate precision ( Measure inter-plate precision ):CV%<10%
Three samples with known concentrations were respectively in 3 Tested on different enzyme plates 40 Times to evaluate the precision of the analytical plate.
Recovery
People who add known concentrations to different samples separately FPR1 , do the recovery experiment, get the recovery range and average recovery rate
Sample Type |
Recovery Range |
Average recovery |
Serum (n=5) |
87-95% |
91% |
EDTA Plasma (n=5) |
93-107% |
100% |
heparin Plasma (n=5) |
87-99% |
93% |
linear
Will add someone FPR1 The samples were diluted separately 2 Times, 4 Times, 8 Times, 16 Double the recovery experiment to obtain the recovery rate range
Sample Type |
1:2 |
1:4 |
1:8 |
1:16 |
Serum (n=5) |
79-91% |
89-103% |
82-95% |
86-99% |
EDTA Plasma (n=5) |
87-96% |
91-101% |
87-98% |
89-103% |
heparin Plasma (n=5) |
87-98% |
92-105% |
95-107% |
82-96% |
|

