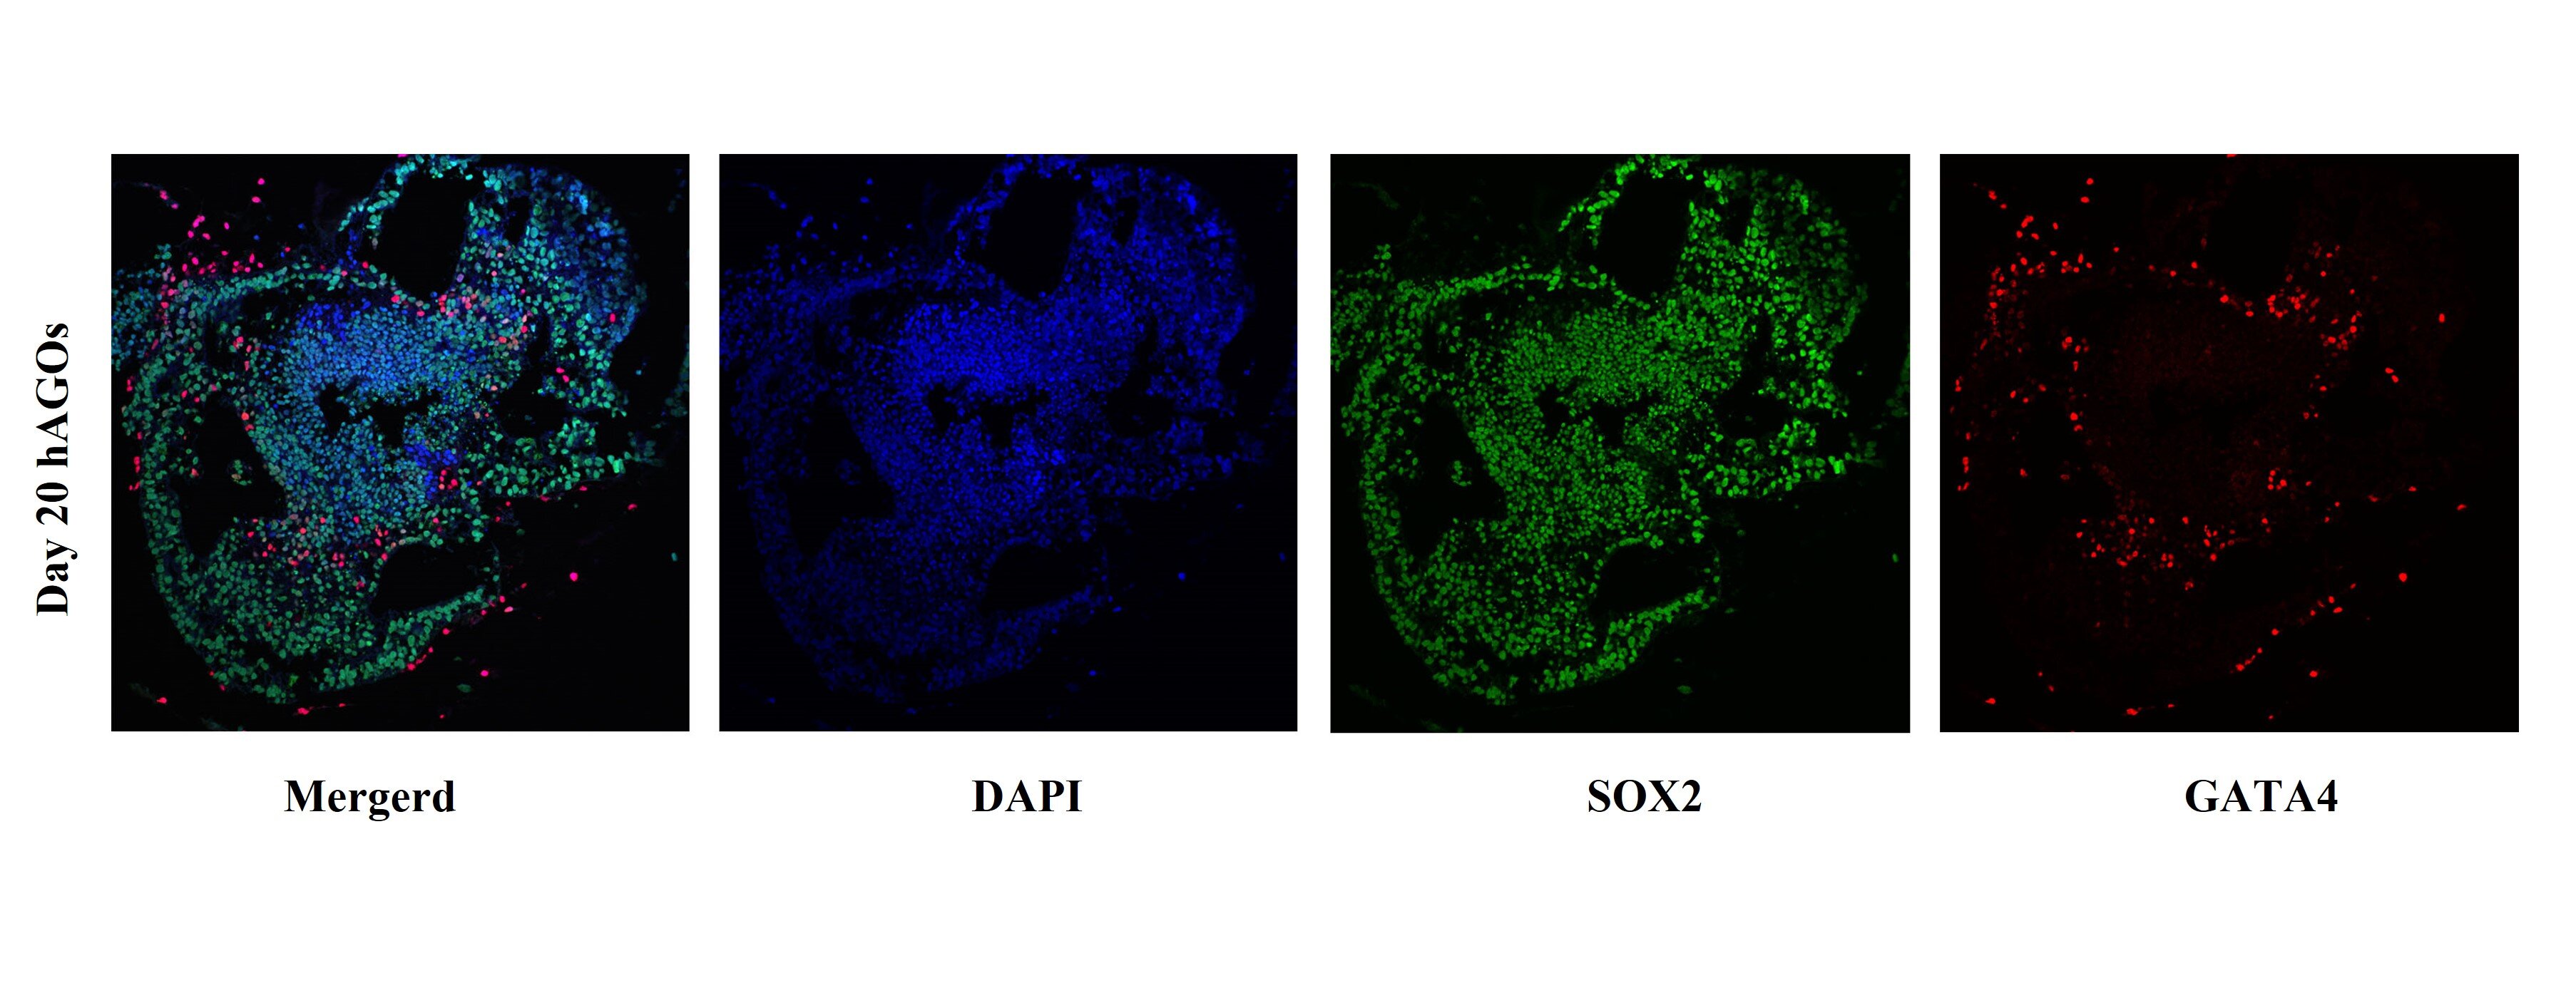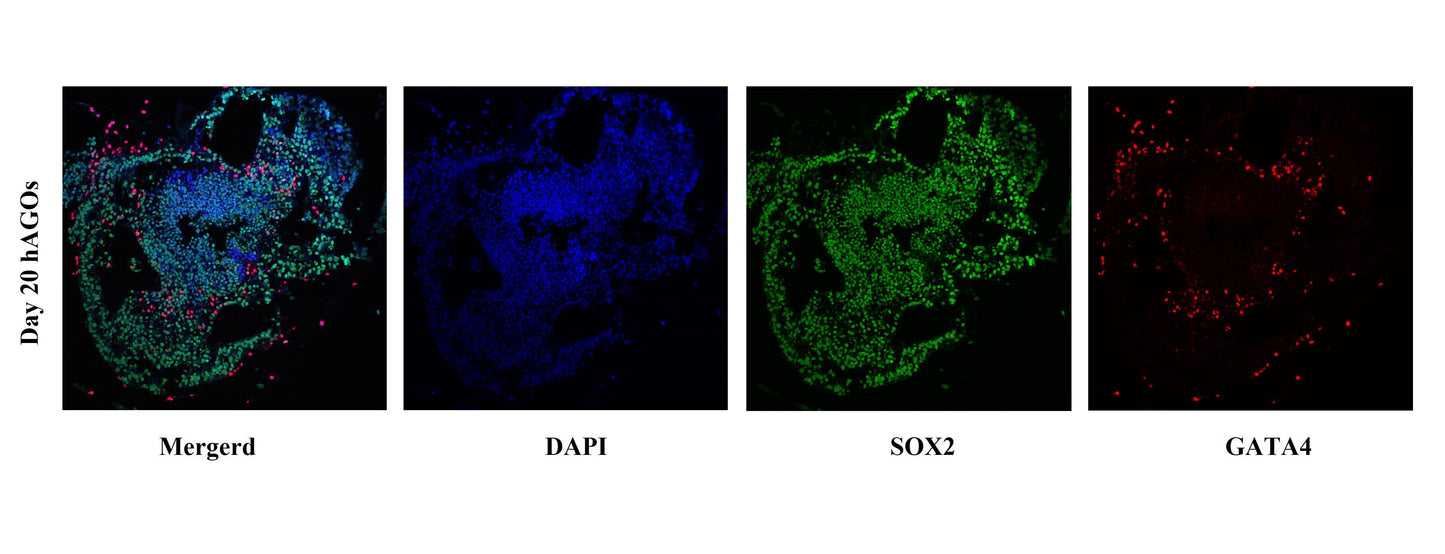

Immunofluorescence detection of characteristic protein expression in gastric organoids: SOX2, a marker of gastric epithelium, is shown in green; GATA4, a marker of gastric progenitor cells, is shown in red.
人胃类器官细胞因子套装
人胃类器官细胞因子套装
Price:
Regular price
$534 USD
Regular price
Sale price
$534 USD
Unit price
per
For shipping services or bulk orders, you may request a quotation.
Secure checkout with

View full details
Product Details
Product Details
Product Specification
| Species | Human |
| Endotoxin | <0.1EU/μg |
| Reconstitution | Reconstitute at 0.1-1 mg/ml according to the size in ultrapure water after rapid centrifugation. |
| Stability & Storage | -20℃ |
| Reference | Broda TR, McCracken KW, Wells JM. Generation of human antral and fundic gastric organoids from pluripotent stem cells. Nat Protoc. 2019 Jan;14(1):28-50. |
Background
Human-derived gastric organoids (hGOs) are three-dimensional miniature gastric structures cultivated in vitro and formed by self-organization of human stem cells. They possess the ability of multi-lineage differentiation of gastric epithelium and can simulate the physiological and pathological characteristics of the stomach. The construction of hGOs mainly follows two technical routes: 1. Induction differentiation of pluripotent stem cells (hPSCs): By gradually regulating signaling pathways such as WNT, FGF, BMP, and retinoic acid, hPSCs are directed to differentiate into the posterior segment of the foregut, and then 3D-cultured to form gastric antrum or gastric fundus organoids, which can be long-term passaged and retain glandular structure. 2. Stem cells from adult gastric tissues (ASCs): Adenoids are isolated from the mucosa of the gastric antrum or gastric body that are discarded after surgery. These are embedded in ECM and supplemented with factors such as EGF, Wnt, R-spondin, Noggin, and FGF10. hGOs corresponding to the specific regions can be rapidly established; to maintain the long-term growth of human gastric body organoids, TGF-β signaling needs to be inhibited. hGOs have become an interdisciplinary platform connecting stem cell biology, developmental biology, and gastrointestinal disease research, providing highly physiologically relevant humanized models for early gastric cancer screening, drug toxicity testing, and regenerative medicine.
Components
| Component | Reference dosage | S Size | S size is configurable. | M Size | M size is configurable. |
| Factor 1 | 50ng/ml (1 time) | 5ug | 100ml | 50ug | 1000ml |
| Factor 2 | 100ng/ml (3 times) | 10ug | 100ml | 100ug | 1000ml |
| Factor 3 | 100ng/ml (9 times) | 50ug | 500ml | 500ug | 5000ml |
| Factor 4 | 200ng/ml (6 times) | 50ug | 250ml | 500ug | 2500ml |
| Factor 5 | 500ng/ml (3 times) | 50ug | 100ml | 500ug | 1000ml |
Protocol
Culture Protocol:
I.hPSC Cell Digestion and Passaging
1. Culture hPSCs to approximately 75-85% confluence, while most cells remain undifferentiated. Aspirate the medium, wash once with D-PBS, and after aspiration, add 1 ml Accutase. Return the culture dish to a 37℃, 5% CO2 tissue culture incubator until all cells dissociate into small cell clumps (usually takes 5-7 minutes).
2. After digestion is complete, add 1ml mTeSR1 medium, gently pipette to detach cells, collect and transfer to a 15ml centrifuge tube, and centrifuge at 300g at room temperature for 3min.
3. Aspirate the supernatant, add 1ml mTeSR1 medium to resuspend cells, and passage at a 1:10 ratio.
4. Seed cells into a Matrigel-coated 6-well plate. Add 3ml mTeSR1 medium (containing 10 μM ROCK inhibitor Y-27632) per well, gently swirl to mix, and place in a 37℃, 5% CO2 tissue culture incubator.
II.hPSCs Differentiation into Definitive EndodermDE(Days0-2)
1. Observe under a microscope. When the monolayer confluence of hPSCs reaches 75-90 %, mark as Day0. Aspirate mTeSR1 medium and replace with DE induction medium. Culture for 48 h, changing medium every 24 h (follow the formulation according to the timeline).Day1-Day2 Floating cell fragments will be visible, while mesh-like connections remain.
2. DE After 48 h of induction, monolayer confluence increases to 95-100 %, with a dense interface and almost no gaps.
III. Spontaneous Budding of Posterior-Anterior Gut Spheroids (Days3-5)
1. Discard the old medium, replace with spheroid induction medium, and continue static culture for 48 h, changing medium every 24 h (prepare formulation strictly according to the timeline).
2. On Day 4, pre-spheroid-like 3D microstructures will be visible at the bottom of the wells.
3. On Day 5, densely budding 3D spheroids will be visible, accompanied by a small number of free-floating cell clusters.
Note: The Day 5 medium contains retinoic acid (RA). Turn off the biosafety cabinet lights before handling, and wrap the medium bottle and RA tube with aluminum foil to prevent photodegradation.
4. On Day 6, when posterior-anterior gut spheroids are largely suspended, they can be collected.
5. Carefully aspirate the posterior-anterior gut spheroids and collect them into a centrifuge tube.
IV. Development of Spheroids intohAGOs (Days6-20)
1. Place Matrigel at 4 °C overnight one day in advance to thaw slowly.
2. Insert the centrifuge tube containing posterior-anterior gut spheroids vertically into a tube rack and let stand for approximately 10 min to allow spheroids to settle naturally by gravity; centrifugation is not required.
3. After aspirating the supernatant, quickly add an appropriate amount of pre-chilled Matrigel along the tube wall. Gently pipette up and down 2-3 times to mix, avoiding bubbles.
4. Take 50 μl of the mixture and drop it into the center of a 24-well plate well; keep the pipette tip slightly above the bottom, do not touch the well wall, and ensure the droplet is round.
5. Place the plate in a 37 °C, 5 % CO₂ incubator and let stand for 20min to allow Matrigel to fully polymerize; then slowly add 700 μl hAGOs formation medium along the wall of each well to completely cover the gel droplet.
6. Starting from the seeding day, change the medium every 2-3 days: if the phenol red indicator turns yellow, or if the experimental protocol requires adjustment of growth factors, immediately replace with fresh hAGOs formation medium, continuing until Day 20.
V.hAGOs Passaging - Maintaining Long-term Expansion
1. Around Day 20, re-embed hAGOs in fresh Matrigel, reduce the density per well, and avoid over-confluence.
2. Discard the old medium, add a small amount of pre-chilled DMEM/F12 along the wall to keep the gel hydrated.
3. Under a stereomicroscope, use a scalpel to cut the Matrigel into small pieces around the hAGOs , with each piece containing 5–10 organoids; avoid cutting through the organoids themselves, as most damaged units can reseal their lumens and continue to proliferate.
4. Re-seed, polymerize gel, and add medium according to Step IV to complete passaging and enter the next culture cycle.
Guidelines
Avoid vortexing; aliquot and store to minimize freeze-thaw cycles.
Picture
Picture
Bioactivity