
Human Normal Skin Organoid Culture Medium
Human Normal Skin Organoid Culture Medium
Price:
Regular price
$794 USD
Regular price
Sale price
$794 USD
Unit price
per
For shipping services or bulk orders, you may request a quotation.
Secure checkout with

View full details
Product Details
Product Details
Product Specification
| Usage |
1. You need to bring your own instruments and reagents and consumables: 1 Instruments: ( 1 Horizontal rotor centrifuge ( Can be reduced to 4℃) ( 2 Biosafety cabinet / ultra-clean workbench ( 3 ) CO2 incubator (5%CO2 , 37℃) ( 4 Low-temperature operating table ( 5 ) refrigerator ( 2-8°C ) ( 6 ) Bathtub / metal bath ( 7 Pipette ( 8 ) Cytometer ( 9 Inverted microscope 2 Reagents and consumables: organoid human normal skin primary tissue digestive fluid ( abs9931 )、 PBS-BSA Moisturizing liquid ( abs9751 ), organoid primary culture buffer ( abs9731 ), penicillin - Streptomycin solution ( 100× , bispecific antibody) ( abs9244 ), fetal bovine serum (superior grade) ( abs972 Matrix glue (low factor, no phenol red) abs9495 ), organoid passage digestive juice ( abs9520 ), organoid subculture buffer ( abs9730 ), organoid cryopreservation solution ( abs9519 ), cell culture dish ( 100mm )( abs7003 )、 40um Cell sieve ( 300 Eyes, blue) abs7305 )、 1.5mL Centrifuge tube (sterile and enzyme-free) ( abs7119 ), cell culture plates (standard transparent) 24 Aperture plate) abs7035 )、 2mL Cryogenic metal ice box ( 24 Hole, flat bottom) abs7289 ) 2. Organoid primary generation: 1 Preparation before use : A Tissue digestive juice preparation Skin tissue digestive juice before use Ⅰ From -20 ℃ Take it out of the environment, let it melt at room temperature, and then turn the bottle upside down several times after it is completely dissolved so that the liquid is fully mixed. skin tissue digestive fluid Ⅰ join 12.5 mL Organoid primary culture buffer, after configuration, record the preparation date on the label. 2- 8℃ Store in the refrigerator away from light. Note: skin tissue digestive fluid Ⅰ After preparation, it is recommended to... 1 It will be used up within a month. B Configuration contains 5%FBS 、 1% penicillin - Organoid primary culture buffer for streptomycin was used as a neutralizing solution to terminate digestion. Note: The centrifuge tubes, guns, etc. used in this experiment must be used in advance. PBS-BSA Moisturizing solution is used for moisturizing. 2 Primary tissue digestion: ( 1 ) Flatten the annular foreskin tissue of the surgical sample on 10 cm In a petri dish, contain 1% penicillin - Streptomycin was soaked in organoid primary culture buffer and rinsed repeatedly to remove residual blood. ( 2 Remove subcutaneous structures of the tissue, such as fat and blood vessels, and rinse several times. ( 3 Cut the tissue evenly into 0.5-1.5 cm Rinse again until the rinse liquid is clear. ( 4 Place the washed small pieces of tissue in... 10 mL Freshly prepared skin tissue digestive fluid Ⅰ In the middle, with the epidermis layer facing down, placed in 4℃ Digest overnight in the refrigerator. Note: The recommended digestion time is 12-14 Hours. ( 5 After overnight digestion, the epidermis and dermis of the foreskin tissue were separated by gentle pulling with sterile forceps, and epidermal skin flakes were collected. ( 6 Cut the epidermis into a paste with sterile ophthalmic scissors and place it in a petri dish. ( 7 ) Join 3 mL skin tissue digestive fluid Ⅱ , at 37℃ Digestion in the incubator 10 minutes. ( 8 Place the petri dish under a microscope to observe the digestion. Note: The wall of the dish can be lightly tapped, and a large number of floating and free cell bright spots can be seen under the microscope, which proves that the digestion process is complete; otherwise, the digestion time can be appropriately prolonged. ( 9 After digestion, add... 3 mL Contains 5%FBS 、 1% penicillin - Organoid primary culture buffer for streptomycin terminates digestion. ( 10 Repeatedly and gently blow to disperse the cell mass. ( 11 ) 40μm Cell sieve filtration, filtrate collected to 50 mL In the centrifuge tube. ( 12 ) 4℃ , 300×g Centrifugation 5 min 。 ( 13 The cell pellet was resuspended using organoid primary culture buffer. ( 14 ) 4℃ , 300×g Centrifugation 5 min 。 ( 15 After centrifugation, the supernatant was discarded, retaining the bottom cell pellet. ( 16 ) according to 0.4-0.6×10⁶ /mL To achieve a certain density, add an appropriate amount of matrix glue and blow mix well. 10-15 Next. Note: This step should be as fast as possible to avoid the matrix glue temperature rising and solidifying. Be careful not to create air bubbles when blowing and hitting. ( 17 ) according to 50 μL / Add the matrix gel and organoid suspension dropwise to the amount of pores. 24 The center of the orifice plate is hemispherical. Note: Ensure rapid operation during plate seeding to avoid solidification due to rising matrix glue temperature. ( 18 Place the culture plate in 37 ℃ Constant temperature incubator 20 min Avoid shaking the culture plate during placement. ( 19 Remove the culture plate and add complete medium to each well. 500 μL 。 ( 20 The organoid seed plate was observed under a microscope, and the culture plate was placed in... 37 ℃ Culture was continued in the cell culture incubator. III. Organoid Passage: 1 Preparation before use: A Organoid complete culture medium and passage digestive juice were packaged separately. ( 1 Before use, complete culture medium and organoid digestive solution were dispensed separately according to the dosage for each use. ( 2 Record the preparation date on the prepared complete medium and label. 2℃ - 8℃ Store in the refrigerator away from light. ( 3 Record the preparation date on the label of the prepared digestive juice. -20℃ Store in the refrigerator away from light. Note: It is recommended that complete culture medium be 1-3 It will be used up within a month. B Matrix glue Place the matrix glue on ice before use or 2℃ - 8℃ refrigerator 2-3 Thaw in hours. Note: Maintain the matrix adhesive during use 4℃ The following (it is recommended to store on ice) will cause the matrix glue to solidify and become unusable due to increased temperature. C Moisturizing During organoid manipulation, all centrifuge tubes and gun tips must be washed before operation to avoid loss of organoid adhesion to the wall. 2 Substitution steps: organoid culture 6-7 The diameter of the cell or organoid is greater than 100μm It can be subcultured and removed from the incubator before subculturing. 24 The well plate was placed under an inverted microscope and observed for contamination or abnormality. ( 1 ) take 50 mL The organoid subculture buffer was precooled on ice. ( 2 Remove the culture plate and aspirate the old culture medium along the edge of the well in a biosafety cabinet. ( 3 Add to each well 500 μL The organoid subculture buffer is repeatedly blown to detach the matrix gel from the bottom of the plate, and the organoids are transferred to... 15mL Centrifuge tube, filled with pre-cooled organoid subculture buffer to 10 mL 。 ( 4 ) Use 1000 μL Gently blow on the gun tip and mix well. 20-30 Next, the organoid is eluted from the matrix gel, 4℃ placement 40 minutes or -20℃ freezing 3-5 minutes. ( 5 ) 4℃ , 400×g Centrifugation 5 min 。 ( 6 After centrifugation, discard the supernatant and the upper matrix gel, and retain the cell pellet. Add new pre-cooled organoid subculture buffer to the tube 6 mL , 1000 μL Gently blow on the gun tip and mix well. 20-30 Next. ( 7 ) 4℃ , 400×g Centrifugation 5 min 。 ( 8 After centrifugation, discard the supernatant, retain the cell pellet, and add it to the centrifuge tube. 2mL Organoid passage digestive juice, using 1000 μL Gently blow the nozzle and mix well, allowing it to digest at room temperature. 3-7min (During this period, mix well with blowing and beating) 1-2 times), dilute the volume with precooled organoid subculture buffer to 6 mL 。 Note: After digestion and blowing, samples can be taken to observe the digestion of organoids under a microscope, and it is advisable to digest organoids into single cells. Care should be taken when discarding the supernatant to avoid loss of organoids during aspiration. ( 9 ) 4 ℃ , 400×g Centrifugation 5 min 。 ( 10 After centrifugation, the supernatant was discarded, retaining the bottom cell pellet. ( 11 ) according to 0.4-0.6×10⁶/mL To achieve a certain density, add an appropriate amount of matrix glue and blow mix well. 10-15 Next. Note: This step should be as fast as possible to avoid the matrix glue temperature rising and solidifying. Be careful not to create air bubbles when blowing and hitting. ( 12 ) according to 50 μL/ Add the matrix gel and organoid suspension dropwise to the amount of pores. 24 The center of the orifice plate is hemispherical. Note: Ensure rapid operation during plate seeding to avoid solidification due to rising matrix glue temperature. ( 13 Place the culture plate in 37 ℃ Constant temperature incubator 20 min Avoid shaking the culture plate during placement. ( 14 Remove the culture plate and add complete medium to each well. 500 μL 。 ( 15 The organoid seed plate was observed under a microscope, and the culture plate was placed in... 37 ℃ Culture was continued in the cell culture incubator. IV. Cryopreservation of organoids: 1 Preparation before use: A Organoid cryopreservation fluid and digestive fluid dispensing ( 1 Before use, the cryopreservation solution and organoid digestive solution are dispensed separately according to the dosage for each use. ( 2 Record the preparation date on the labels of the prepared cryopreservation solution and digestive solution, respectively. -20℃ Store in the refrigerator away from light. B Moisturizing During organoid manipulation, all centrifuge tubes and gun tips must be washed before operation to avoid loss of organoid adhesion to the wall. 2 Freezing and storage steps: organoid culture 6-7 The diameter of the cell or organoid is greater than 50 μm Organoids can be frozen and removed from the incubator before freezing. 24 The well plate was placed under an inverted microscope and observed for no contamination abnormalities. ( 1 ) take 50 mL The organoid subculture buffer was precooled on ice. ( 2 Remove the culture plate and aspirate the old culture medium along the edge of the well in a biosafety cabinet. ( 3 Add to each well 500 μL The organoid subculture buffer is repeatedly blown to detach the matrix gel from the bottom of the plate, and the organoids are transferred to... 15mL Centrifuge tube, filled with pre-cooled organoid subculture buffer to 10 mL 。 ( 4 ) Use 1000 μL Gently blow on the gun tip and mix well. 20-30 Next, the organoid is eluted from the matrix gel, 4℃ placement 40 minutes or -20℃ freezing 3-5 minutes. ( 5 ) 4℃ , 400×g Centrifugation 5 min 。 ( 6 After centrifugation, discard the supernatant and the upper matrix gel, and retain the cell pellet. Add new pre-cooled organoid subculture buffer to the tube 6 mL , 1000 μL Gently blow on the gun tip and mix well. 20-30 Next. ( 7 ) 4℃ , 400×g Centrifugation 5 min 。 ( 8 After centrifugation, discard the supernatant, retain the cell pellet, and add it to the centrifuge tube. 2mL Organoid passage digestive juice, using 1000 μL Gently blow the nozzle and mix well, allowing it to digest at room temperature. 3-7min (During this period, mix well with blowing and beating) 1-2 times), dilute the volume with precooled organoid subculture buffer to 6 mL 。 Note: After digestion and blowing, samples can be taken to observe the digestion of organoids under a microscope, and it is advisable to digest organoids into single cells. Care should be taken when discarding the supernatant to avoid loss of organoids during aspiration. ( 9 ) 4 ℃ , 400×g Centrifugation 5 min 。 ( 10 After centrifugation, the supernatant was discarded, retaining the bottom cell pellet. ( 11 ) according to 0.5×10⁶ cell/Vial (The user can determine the cryopreservation density according to their needs) Add organoid cryopreservation solution to the centrifuge tube. ( 12 After thorough mixing, the suspension was dispensed into cell cryopreservation tubes. 1 mL/Vial )。 ( 13 Place it in the programmed cooling box and transfer it to... -80℃ In the refrigerator, transfer the organoids to a liquid nitrogen tank for long-term storage the next day. V. Organoid resuscitation: 1 Preparation before use: A Complete culture medium dispensing ( 1 Before use, the complete culture medium is dispensed according to the amount used each time. ( 2 Record the preparation date on the label of the prepared complete culture medium. 2℃ - 8℃ Store in the refrigerator away from light. Note: It is recommended that complete culture medium be 1-3 It will be used up within a month. B Matrix glue Place the matrix glue on ice before use or 2℃ - 8℃ refrigerator 2-3 Thaw in hours. Note: Maintain the matrix adhesive during use 4℃ The following (it is recommended to store on ice) will cause the matrix glue to solidify and become unusable due to increased temperature. C Moisturizing During organoid manipulation, all centrifuge tubes and gun tips must be washed before operation to avoid loss of organoid adhesion to the wall. 2 Resuscitation steps: The resuscitation process, from thawing the cryopreservation tube to placing it in the incubator, is controlled. 30 min Within, to ensure sufficient organoid survival. ( 1 Prepare a low-temperature, low-speed centrifuge and set the temperature to... 4℃ Pre-cooling. ( 2 Place the sample loading gun tip in advance. -20 ℃ Pre-cool and remove before sample addition. 24 Place the orifice plate in advance 37℃ Preheat the constant temperature incubator. ( 3 Place the matrix glue on ice in advance or 4℃ Defrost the refrigerator. ( 4 ) 15mL sterile centrifuge tube PBS-BSA After washing with the moisturizing solution, place it on ice for precooling. ( 5 Remove the complete medium from the refrigerator and equilibrate the temperature to room temperature. ( 6 Remove the organoids from the liquid nitrogen storage tube and quickly place the cryopreservation tube in... 37 ℃ rapid shaking of the water bath 1-2 min Remove the ice after most of the ice in the cryopreservation tube has melted. Note: When removing organoids from liquid nitrogen tanks, please strictly follow the laboratory's biosafety management regulations and take precautions against frostbite. ( 7 Place the cryopreservation tubes on ice, bring them into the cell space, disinfect the tube walls with alcohol swabs, and then transfer the organoid suspension to a pre-cooled cabinet in a biosafety cabinet. 15 mL In the centrifuge tube, add 5mL Organoid subculture buffer, washed with 1000 μL Gently blow on the pipette tip 10 Mix well. ( 8 ) 4℃ , 300×g centrifuge 5 min 。 After centrifugation, the supernatant was discarded to retain the precipitate. Note: After centrifugation, carefully observe the bottom of the centrifuge tube. There is a thin white layer of precipitate to avoid losing organoids when aspirating. ( 9 Add to the centrifuge tube 600 uL Gently mix the pre-cooled matrix glue. 10-15 Next. Note: This step should be as fast as possible to avoid the matrix glue temperature rising and solidifying. Be careful not to create air bubbles when blowing and hitting. Please adjust the density appropriately according to the cell ( 10 ) according to 50μL/ Add the matrix gel and organoid suspension dropwise to the amount of pores. 24 The center of the orifice plate is hemispherical. Note: Ensure rapid operation during plate seeding to avoid solidification due to rising matrix glue temperature. ( 11 Place the culture plate in 37 ℃ Incubation in constant temperature incubator 40 min Avoid shaking the culture plate during placement. ( 12 After incubation, remove the culture plate and add complete culture medium to each well. 500 μL 。 ( 13 The organoid resuscitation was observed under a microscope, and the culture plate was placed in... 37℃ Culture was continued in the cell culture incubator. ( 14 Organoid fluid exchange: every 2 Change the fresh medium once a day. Flowchart: 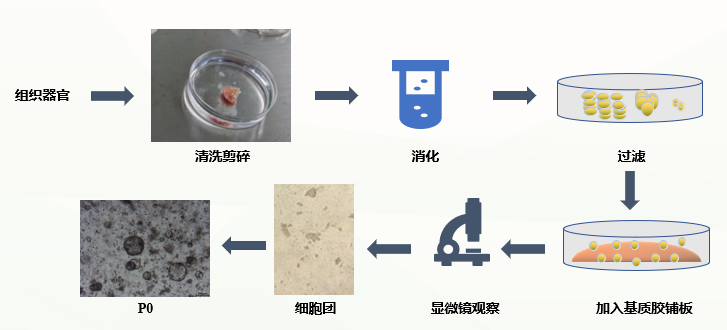 |
||||||||||||
| Description | This product provides an optimized, efficient, and stable overall solution for the resuscitation, culture, passage, and cryopreservation of human epidermal organoids. This product is used for the establishment and maintenance culture of human epidermal organoids. Human organ recombinant epidermis models require the use of human organ recombinant epidermis culture media. Organoids as a new type 3D In vitro study model, In developmental biology, It has great application prospects in basic research and precision tumor treatment. 。 Product Composition:
1 Before use, mix the components B and components C Placed 2℃ - 8℃ refrigerator 2-3 Once completely melted, add the ingredients. B and components C Add to components A In the middle, fully mix well to prepare a complete culture medium; 2 Dispense the complete culture medium according to the amount used each time; 3 The date of preparation is recorded on the label. 2℃ - 8℃ Store in the refrigerator away from light. Note: It is recommended that the complete culture medium be 1-3 Used within a month; components B and components C Do not freeze or thaw repeatedly; |
||||||||||||
| Storage Temp. | Component A was stored at 2-8℃ and protected from light for 12 months. Component B -75℃, avoid repeated freezing and thawing for 12 months. Component C -75℃, avoid repeated freezing and thawing, 12 months. |