
Goat TNFa ELISA Kit
Goat TNFa ELISA Kit
Price:
Regular price
$381 USD
Regular price
Sale price
$381 USD
Unit price
per
For shipping services or bulk orders, you may request a quotation.
Secure checkout with

View full details
Product Details
Product Details
Product Specification
| Usage |
I. Self-provided test equipment required for the experiment: 1 Standard plate reader (including wavelength) 450nm ) 2 High speed centrifuge 3 Electric heating incubator 4 Mixer 5 High-precision pipettes, EP Tubes and disposable tips ( 0.5-10uL 、 2-20uL 、 20-200uL 、 200-1000uL ) 6 Double distilled water or deionized water, volumetric flasks, absorbent paper, etc. II. Sample Collection, Preparation and Storage: 1 Serum: Whole blood samples were kept at room temperature. 2 Hours or 4℃ After overnight 1000×g centrifuge 20 Minutes, take the supernatant for detection. Blood collection tubes should be disposable, heat-free, and endotoxin-free tubes. deposit -20℃ or -80℃ For storage, avoid repeated freezing and thawing. 2 Plasma: The sample after collection. 30 Within minutes 2-8℃ 、 1000×g centrifuge 15 Minutes, take the supernatant for detection. Recommended use of anticoagulants EDTA-Na2 Avoid using hemolytic and hyperlipidemic samples. deposit -20℃ or -80℃ For storage, avoid repeated freezing and thawing. 3 Tissue homogenization: Take an appropriate amount of tissue pieces and place them in the pre-cooled... PBS ( 0.01M , pH7.0-7.2 The blood is cleaned and removed in the homogenate (lysed red blood cells in the homogenate will affect the measurement results). After weighing, the tissue is shredded and then combined with the corresponding volume. PBS (Generally according to 1:9 The mass-to-volume ratio can be adjusted appropriately according to experimental needs, and records should be kept. It is recommended to... PBS China joined 1% Protease inhibitors) were added to a glass homogenizer and thoroughly ground on ice; To further lyse tissue cells, the homogenate can be subjected to ultrasonic disruption or repeated freeze-thaw treatment (pay attention to ice bath cooling during ultrasonic disruption, and the repeated freeze-thaw method can be repeated). 2 Next). Finally, the prepared homogenate is placed in... 5000×g centrifuge 5-10 Minutes, take the supernatant for detection. 4 Cell culture supernatant: Take the cell supernatant from 1000×g centrifuge 20 Minutes to remove impurities and cell debris. The supernatant can be taken for detection and placed in -20℃ or -80℃ Store, but avoid repeated freezing and thawing. 5 Urine: Please collect your first urine in the morning (middle urine), or 24 Hourly urine, 2000×g centrifuge 15 Collect the supernatant after 10 minutes and store the sample At -20℃ And repeated freezing and thawing should be avoided. 6 Saliva: Collect samples using a saliva sample collection tube, and then... 2-8℃,1000×g centrifuge 15 The supernatant can be taken for testing within minutes, or it can be repackaged and then... -20℃ Save. Avoid repeated freezing and thawing. 7 Other biological samples: Please 1000×g centrifuge 20 Minutes, take the supernatant for detection. Note: The sample should be clear and transparent, and the suspended matter should be removed by centrifugation. Hemolysis of the sample will affect the results, so hemolyzed samples should not be used. If after sample collection 1 Tests performed within a week can be stored at 4℃ If testing is not possible in time, please repackage according to the single-use amount and freeze it. -20℃ ( 1 Testing within a month), or -80℃ ( 3-6 (Testing within the month) to avoid repeated freezing and thawing. Please allow the sample to stand at room temperature before the experiment. III. Sample dilution protocol: If your test sample needs to be diluted, the general dilution principles are referenced below: 1 Dilution 50 Double: one-step dilution. take 5uL Sample to 245uL Standard & In the sample dilution, is 50 fold dilution; 2 Dilution 100 Double: one-step dilution. take 5uL Sample to 495uL Standard & In the sample dilution, is 100 fold dilution; 3 Dilution 1000 Double: Two-step dilution. take 5uL Sample to 95uL Standard & In the sample dilution, is 20 Dilute twice, then take 5uL 20 Fold the diluted sample to 245uL Standard & In the sample dilution, is 50 Double dilution, co-dilution 1000 times; 4 Dilution 100000 Double: Three-step dilution. take 5uL Sample to 195uL Standard & In the sample dilution, is 40 Dilute twice, then take 5 uL 40 Fold the diluted sample to 245uL Standard & In the sample dilution, do 50 Dilute twice, and finally take... 5uL2000 Fold the diluted sample to 245uL Standard & In the sample dilution, do 50 Fold dilution, total dilution 100000 times; 5 The amount of liquid taken during each dilution step shall not be less than 3uL Dilution factor not exceeding 100 Double. Too small a sample size can easily cause greater errors during the mixing process. Each dilution step must be mixed evenly to avoid foaming. 6 In cases where the dilution factor is very high, it can be used first. PBS Dilution, final step using the standard from the kit & Sample dilution. IV. Pre-testing preparations: 1 Please advance 30 Remove the kit from the refrigerator and allow to equilibrate to room temperature. 2 Use double distilled water to 25× The concentrated wash solution was diluted into 1× Return any unused working fluid. 4℃ 。 3 Standard: Add standard & sample universal diluent 1.0mL Transfer to the lyophilized standard, tighten the tube cap, and let stand. 10 After it has fully dissolved, gently mix well (concentration is...). 1000pg/mL )。 Then it was diluted in a double ratio to... 1000pg/mL , 500pg/mL , 250 pg/mL , 125pg/mL , 62.5pg/mL , 31.25pg/mL , 15.63pg/mL Standard dilution ( 0pg/mL ) is a blank hole. Prepare the standards for use according to the amount you need. It is recommended that the configured standards be 15 Add the sample within minutes; it is not recommended to leave it for too long. 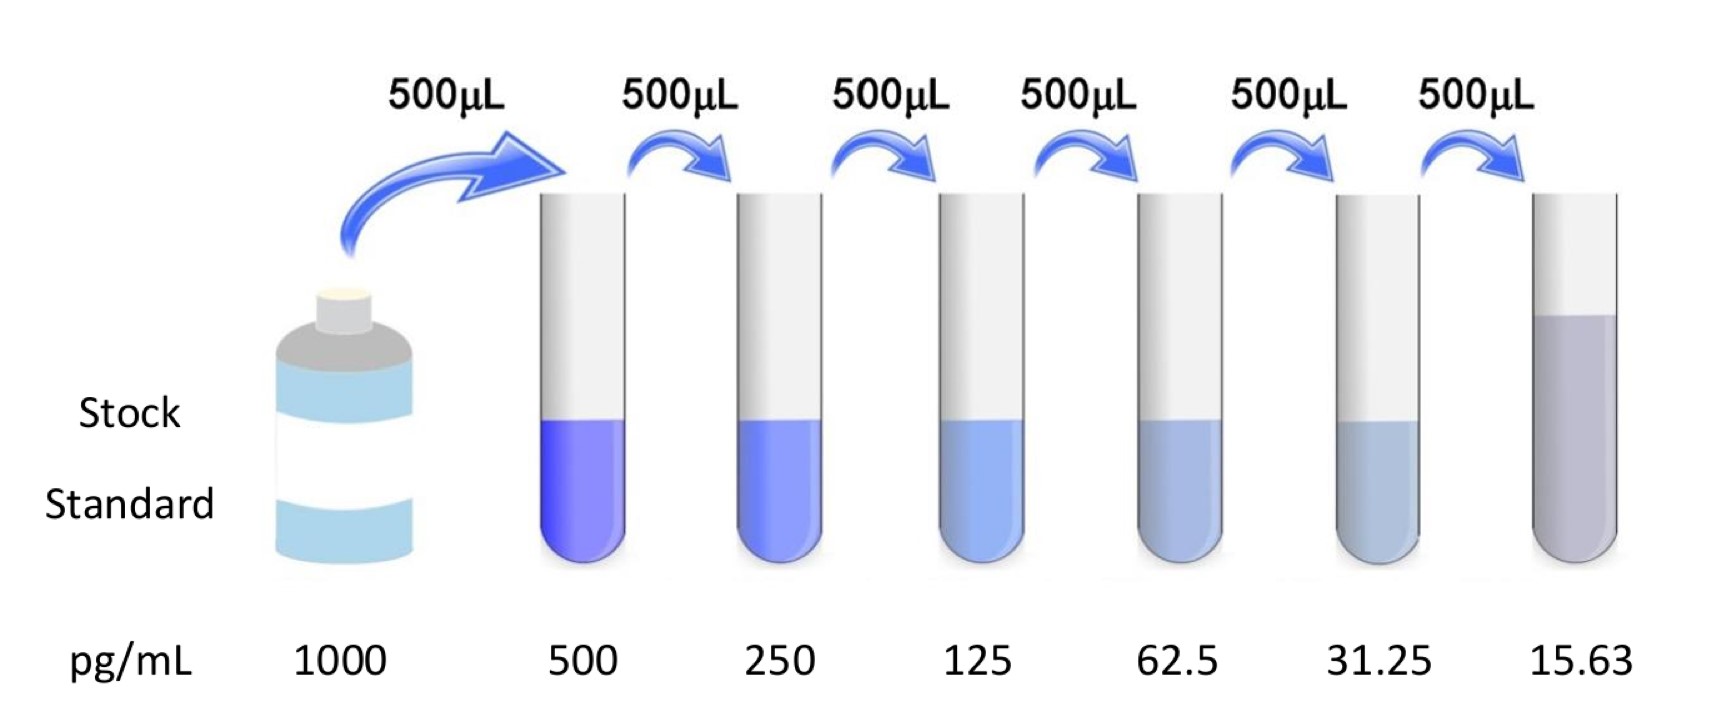 5 Enzyme conjugate working solution: Calculate the amount required for this experiment before the experiment (according to 100uL/ Hole meters should be configured multiple times during actual configuration. 100-200uL )。 Before use 15 Dilute the concentrate with enzyme conjugate diluent for minutes. HRP Enzyme conjugate ( 1:100 The working concentration is reached and used on the same day. Dilution principle is taken 1uL The concentrated enzyme conjugate was added to 99uL In the enzyme conjugate dilution, mix well with a pipette. 6 、 TMB substrate —— Draw the required dose of solution with a pipette and do not pour the residual solution back into the vial. V. Operating Steps: 1 Before the experiment begins, all reagents should be equilibrated to room temperature and all reagents should be prepared in advance. Calculate the number of samples that may be used throughout the test and reserve sufficient samples in advance. When diluting reagents or samples, they must be mixed well, and foaming should be avoided as much as possible during mixing. If the sample concentration is too high, dilute it with sample diluent to make the sample within the detection range of the kit. 2 Add standard or sample to be tested 100uL (If the sample needs to be diluted, please refer to the sample dilution principle for the dilution method). Note that there are no air bubbles. When adding the sample, add the sample to the bottom of the enzyme label plate well, trying not to touch the well wall. Gently shake and mix well. Cover or cover the enzyme label plate. 37℃ incubation 80 minutes. To ensure the validity of the experimental results, please use a new standard solution for each experiment. 3 Discard the liquid inside the well, spin dry, and wash the plate. 3 Next. Each hole 200uL Washing with detergent, soaking 1-2 For minutes, shake off the liquid from the enzyme label plate (or wash the plate using a plate washer). After the last wash was completed, the enzyme label plate was patted dry on absorbent paper. 4 Add biotin antibody working solution to each well 100uL (Can be done in advance) 15 (Prepared in minutes), the enzyme label plate is coated with a film. 37℃ incubation 50 minutes. 5 Discard the liquid inside the hole and wash the plate. 3 Next. Each hole 200uL Washing with detergent, soaking 1-2 For minutes, shake off the liquid from the enzyme label plate (or wash the plate using a plate washer). After the last wash was completed, the enzyme label plate was patted dry on absorbent paper. 6 Add enzyme conjugate working solution to each well 100uL (Can be done in advance) 15 (Prepared in minutes) 37℃ incubation 50 minutes. 7 Discard the liquid inside the hole and wash the plate. 5 Next. Each hole 200uL Washing with detergent, soaking 1-2 For minutes, shake off the liquid from the enzyme label plate (or wash the plate using a plate washer). After the last wash was completed, the enzyme label plate was patted dry on absorbent paper. 8 Add to each well TMB chromogenic substrate solution 90uL , 37℃ Incubation in the dark 20 Minutes (shortened or extended as appropriate depending on actual color development, but not exceeding 30 minutes). 9 Add stop solution to each well 50uL The reaction is terminated (at which point the blue color immediately turns yellow). The order of addition of the stop solution should be as similar as possible to the order of addition of the color developer. To ensure the accuracy of the experimental results, the stop solution should be added as soon as possible after the substrate reaction time expires. 10 Immediately use a microplate reader. 450nm Measure the optical density value of each hole at the wavelength ( OD value). The instrument should be preheated before use, and the testing procedure should be set. VI. Calculation of Experimental 1 For each standard and sample OD The value should be subtracted from the blank hole. OD Value. If multiple holes are set, the average value should be used for calculation. 2 For ease of calculation, although concentration is an independent variable... OD The value is a dependent variable; we will still use the standard when drawing. OD Value as abscissa ( X Axis), and the concentration of the standard is on the ordinate ( Y axis). Also, for the intuitiveness of the test results, the figures provide raw data rather than logarithmic values. Due to differences in experimental operating conditions (such as operator, pipetting technique, plate washing technique, and temperature conditions), the standard curve... OD The values will vary. The standard curves provided are for reference only, and experimenters need to establish standard curves based on their own experiments. Used samples OD The value can be calculated from the standard curve to calculate the sample concentration, and then multiplied by the dilution factor, which is the actual concentration of the sample. It is recommended to use professional curve drawing software, such as curveexpert 。 1 , Precision: 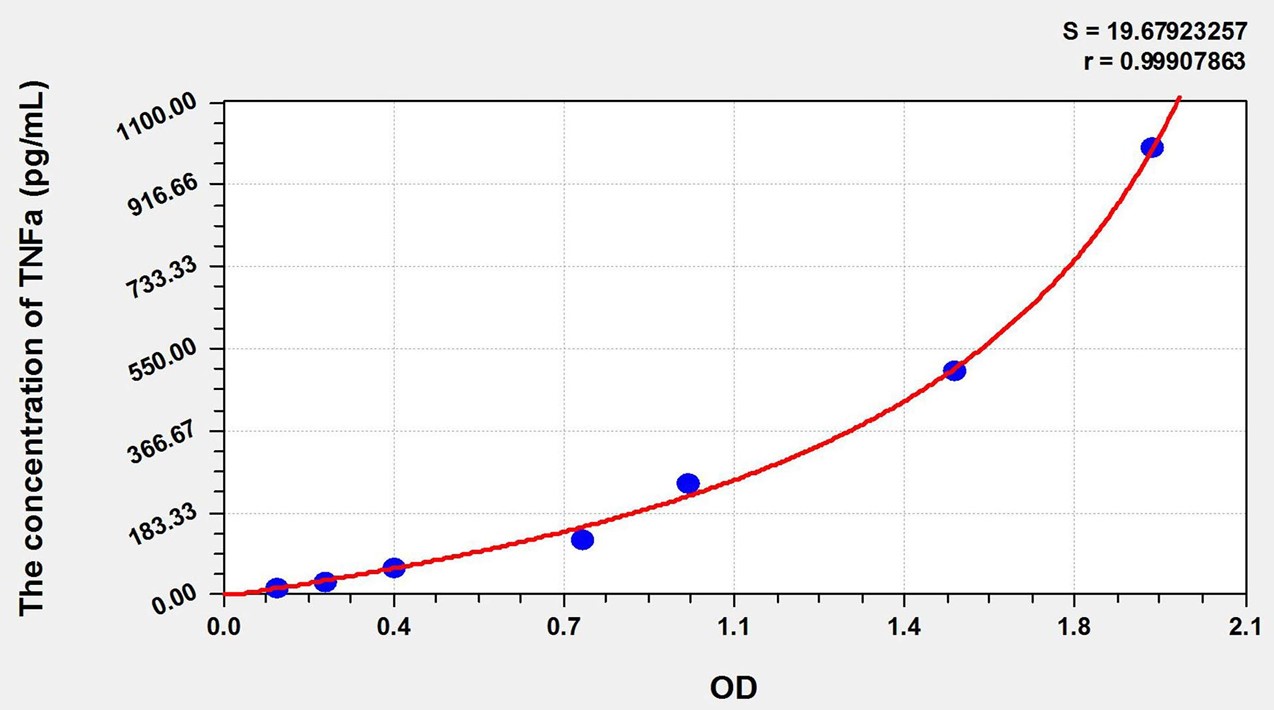 VII. Kit performance: in-plate precision ( Precision within the assay ):CV%<8% Three samples with known concentrations were respectively 1 Enzyme-labeled plate test 20 Times to evaluate the in-plate precision of the assay. Interplate precision ( Determination of inter-plate precision ):CV%<10% Three samples with known concentrations were respectively 3 Tested on several different enzyme-labeled plates 40 This was performed several times to evaluate the precision of the analytical plate. 2 Recovery: Add known concentrations of goats to different samples respectively. TNFa The recovery rate experiment was conducted to obtain the recovery range and average recovery rate.
3 Linear dilution: Goats will be added TNFa Dilute the samples separately 2 times, 4 times, 8 times, 16 Recovery experiments were conducted to determine the recovery range.
|
|||||||||||||||||||||||||||||||||||||||
| Sensitivity | 5.9pg/mL | |||||||||||||||||||||||||||||||||||||||
| Species Reactivity | Goat | |||||||||||||||||||||||||||||||||||||||
| Theory | This kit adopts the principle of sandwich method. Specific anti-goat TNFa antibodies were coated in 96-well microplates, goat TNFa standards or samples were added to the microwells respectively, the goat TNFa protein in the standards or the goat TNFa protein in the samples were bound to the anti-goat TNFa antibodies immobilized on the microplates, then biotinylated anti-goat TNFa antibodies were added, the unbound biotinylated antibodies were washed, HRP-labeled streptavidin was added, and after thorough washing again, TMB substrate was added for color development. TMB turns blue under peroxidase catalysis and eventually yellow under the action of acid. The depth of color was positively correlated with the goat TNFα protein in the sample. The absorbance (OD value) was measured with a microplate reader at a wavelength of 450 nm, and the sample concentration was calculated by plotting a standard curve. | |||||||||||||||||||||||||||||||||||||||
| Synonym | Goat Tumor Necrosis Factor Alpha ELISA Kit;DIF; TNF-A; TNFSF2; Cachectin; Tumor Necrosis Factor Ligand Superfamily Member 2 | |||||||||||||||||||||||||||||||||||||||
| Detection Type | sandwich method | |||||||||||||||||||||||||||||||||||||||
| Composition |
|
|||||||||||||||||||||||||||||||||||||||
| General Notes | 1 If the entire kit is stored in -20°C Please place the reagent kit the night before the experiment. 4°C 。 2 Salt will precipitate when the concentrated washing liquid is stored at low temperature. When diluted, it can be heated in a water bath to help dissolve. 3 The newly opened enzyme label plate wells may contain a small amount of water-like substance, which is normal and will not affect the experimental results. 4 All kit components have undergone formulation and quality control testing to successfully function as a kit. Do not mix or substitute reagents or materials from other kits; performance cannot be guaranteed if used alone or substituted. 5 This kit is for laboratory research and development purposes only and is not intended for use in humans or animals. 6 Reagents should be treated as hazardous substances, and should be handled carefully and properly. 7 Gloves, lab gowns, and protective glasses should always be worn to avoid skin and eye contact with the termination solution. TMB 。 In case of accidental contact, please rinse thoroughly with water. 8 Before using the kit, please ensure that all components are dissolved and mixed well. If the reconstituted standard is not used up, discard it. 9 Concentrated biotinylated antibodies. The concentrated enzyme conjugate is relatively small in size and may be scattered in various parts of the tube during transportation. Please note this before use. 1000×g centrifuge 1 Minutes to allow the liquid from the tube wall or bottle cap to settle to the bottom of the tube. Carefully blow with a pipette before use 4-5 Next, mix the solution well. Please prepare the standard, biotinylated antibody working solution, and enzyme conjugate working solution according to the required dosage and use the corresponding diluent to prepare them, and do not confuse them. 10 The concentrated washing liquid taken out of the refrigerator may have crystals, which is normal. You can use a water bath or incubator to completely dissolve the crystals before preparing the washing liquid (the heating temperature should not exceed...). 40°C )。 The washing solution should be at room temperature during use. 11 Sample addition should be done quickly, and each sample addition should ideally be controlled within the 10 Within minutes, to ensure experimental accuracy, it is recommended to use duplicate wells. When pipetting reagents, a consistent addition sequence is maintained from one well to another, This will ensure that all wells have the same hatching time. 12 During the washing process, the remaining washing liquid in the reaction hole should be patted dry on absorbent paper. Do not put the filter paper directly into the reaction hole to absorb water. Before reading, be sure to remove any remaining liquid and fingerprints from the bottom to avoid affecting the microplate reader reading. 13 Color developer TMB Direct exposure to strong light should be avoided during storage and use. After adding the substrate, pay attention to the color change in the reaction well. If the gradient is obvious, please stop the reaction in advance to avoid the color being too dark and affecting the reading of the microplate reader. 14 All test tubes and reagents used during the experiment are disposable and are strictly prohibited from being reused, otherwise it will affect the experimental results. 15 During the experiment, please wear a lab coat and latex gloves to take protective measures. In particular, when testing blood or other bodily fluid samples, please comply with the National Biological Laboratory Safety Protection Regulations. 16 Kit components of different batch numbers cannot be mixed (except for washing solution and reaction stopping solution). 17 The enzyme label strips in the kit are removable plates. Please use them in batches according to experimental needs. |
|||||||||||||||||||||||||||||||||||||||
| Instructions | Serum, plasma, tissue homogenates, cell lysates, cell culture supernatants and other biological fluids | |||||||||||||||||||||||||||||||||||||||
| Storage Temp. | Unopened kit, stored at 4℃, shelf life 6 months. | |||||||||||||||||||||||||||||||||||||||
| Test Range | 15.63-1000pg/mL |